Interior Painting Tips
My interior painting tips are scattered throughout the site in the step-by-step interior painting guides but I’ve collected the most important of them here!
If you leave this site with no other information, these twelve interior painting tips will help to make your project immeasurably simpler! And you’ll see better results.
You will note how many of the tips below correspond with the interior painting preparation step! I’ve said it frequently elsewhere on the site, but preparation is critical to a quality painting project. Thorough preparation of your supplies and surfaces will give you a 10x better chance of a successful project.
And check out my separate list of interior paint clean up tips, including how to clean paint brushes!

Professional Interior Painting Tips
Tip #1: Have Realistic Expectations!
The first of my interior painting tips applies for any home project, but painting in particular. Enter each interior painting project with an open mind. Realize that not everything will go perfectly.
Everyone’s favorite shows on HGTV, with their teams of professionals, make these projects look like a breeze! Four rooms are completed in a day. The color matches perfectly. Nobody spilled paint on the floor or forgot to buy painter’s tape. Welcome to the magic of daily practice and film editing.
On rare occasions that may be the case. But more often there are problems, large or small.
There’s a likelihood you will forget to buy something you need. There’s a chance you may start the job and realize you don’t care for the color you chose. Or that it will take more time (or more coats) than you counted on. Or that the drywall is in poorer shape than you had first thought.
A successful project means you take these setbacks in stride and tackle them individually as they arise. These are the sort of issues that even professional painters run into regularly, and a weekend DIYer will certainly encounter them.
Tip #2: Clear the room!
Get everything out of your way! Clear the space or room to be painted as much as possible. Furniture, outlet and light switch covers, photos and wall hangings, even light fixtures and doors if possible.
The fewer obstacles you leave in the room, the less you must work around. That means fewer tight spaces, moving ladders less frequently, and less chance of spattering your valuable furnishings and décor with paint!
Store and label any removed outlet covers or light switch covers in Ziploc bags so they can be easily returned to their rightful place.
Any items that cannot be removed – such as large furniture pieces – move to the center of the room and cover with plastic to protect against paint spills and splatters.

Tip #3: Clean and Patch Your Walls
Having a clean and flat surface is essential to a quality paint job. If your walls are uneven, damaged, or in otherwise poor condition, a fresh coat of paint is more likely to highlight than hide those imperfections.
Dust and wash your walls thoroughly with a mild solution of dish soap and water. A damp rag or sponge-headed mop works well for this job. Be sure to rinse all soapy residue from the walls and allow to dry before painting.
Fill in nail holes, dents, and small cracks with spackle or drywall compound. Allow to dry and sand flush. Caulk all gaps where your walls or surfaces meet with woodwork or trim with paintable caulk.
Be sure to at least spot-prime any areas you patched with spackle or those areas may appear shinier or more visible after painting.
Tip #4: Use only Painter's Tape
Some of these interior painting tips may seem to be common sense, but I see many of the same mistakes made time and again.
I often see acquaintances attempting to use masking tape – or worse – for their interior painting projects. This can lead to damage of painted surfaces, woodwork, or floors.
Painter’s tape is typically blue or purple – though FrogTape, a common brand, can be yellow or green. Just be certain that your tape specifically calls itself “Painter’s Tape”. There is also an even lower tack “delicate” Painter’s Tape for use on more recently painted surfaces.
Traditional “masking tape” is not suitable for applying to painted walls or wood surfaces, as it has a high tack backing and it could remove the surface paint or leave adhesive behind when removed.
Also, never leave any tape on for long periods of time after painting. Apply the painter’s tape directly before painting, and remove as soon as feasible afterwards. Even painter’s tape, if left too long on a surface, will adhere and could damage the surface when removed.
Tip #5: Double-check Your Tape
Once you’ve gone through all the effort of taping off woodwork and adjoining surfaces, double-check to ensure your tape is flat and completely adhered to the surface you aim to protect.
Run a putty knife or plastic flat edge along the edge of the tape. If your tape is not evenly and completely adhered, paint will bleed behind it onto the surface you are trying to protect.
Tip #6: Buy Quality Materials
Of all my interior painting tips, this is one of the most critical. If you want a quality paint job, you have to choose quality supplies and materials. In spite of more up-front cost for quality supplies, you will find that cost will be repaid in reduced frustration and less lost time.
Painting is often done on a budget. We all like to save money and cut corners when we can. But choosing inferior or budget paint products and supplies is a risky venture.
This does NOT mean that you need to buy $60/gallon+ paints or high end artist’s brushes to get a quality finish. High-end paint products are sometimes worth the extra cost and must be a choice based on your personal factors. But a mid-grade gallon of brand-name paint can often be had for $20-25 and I can help you choose the best paint brush for your job for under $20.
If you see a $1 bargain bin of paint brushes or roller covers in generic packaging, keep walking. Your sanity is worth more than that.
Tip #7: Wash New Roller Covers
Before use, wash brand-new roller covers in dish soap and warm water. Rinse clean of any soapy residue before using. Even high-quality roller covers have some loose fibers that could end up in your wet paint, ruining an otherwise flawless surface.
Tip #8: Maintain a Wet Edge
This is one of those interior painting tips I wish I’d gotten before I tried to paint my first room!
As a novice DIYer, I made the amateur mistake of cutting in an entire room and then starting to paint the walls the following day.
The result was a visible division or lap-line between where I had cut in the walls and where I had begun to paint. This was because the paint from the previous day had dried and left a ridge that was visible in the final paint finish.
To blend sections together, you must continue to work with a wet edge of paint. This means cutting in only small sections as you go, then rolling out that section before it has a chance to dry. This blends the areas into a cohesive finish.
Once you’ve begun painting a wall, do not stop until you’ve completed it. This will allow you to maintain your wet edge and blend sections seamlessly.
Tip #9: Purchase and Use an Extension Roller
A paint extension pole for a roller is a blessing for house painters.
A pole extension is an adjustable pole that screws into the end of a standard roller handle. It allows the painter to reach ceilings, higher walls, and hard-to-reach areas without the requirement of climbing ladders.
It is also a savior for the back, allowing the paint to be applied from an ergonomic standing position instead of constantly bending, reaching, and crouching.
Tip #10: Removing the Tape
This is another of those interior painting tips I had to learn the hard way.
When you remove the painter’s tape at the end of your job, the paint has formed a skin over the surface where the newly applied paint and the tape meet. This means that when you go to remove the tape, it will frequently pull off sections of paint with it, especially if that paint isn’t fully “cured” to the wall.
There are a few tips that can help avoid this issue.
First, ensure the paint had fully dried before removing the tape. Gummy or half-dried paint is more likely to tear away from the surface.
Second, run the sharp blade of utility knife lightly along the edge where the tape and paint join to break the seal between them.
Finally, remove the tape slowly and at a 45-degree angle away from the painted edge.
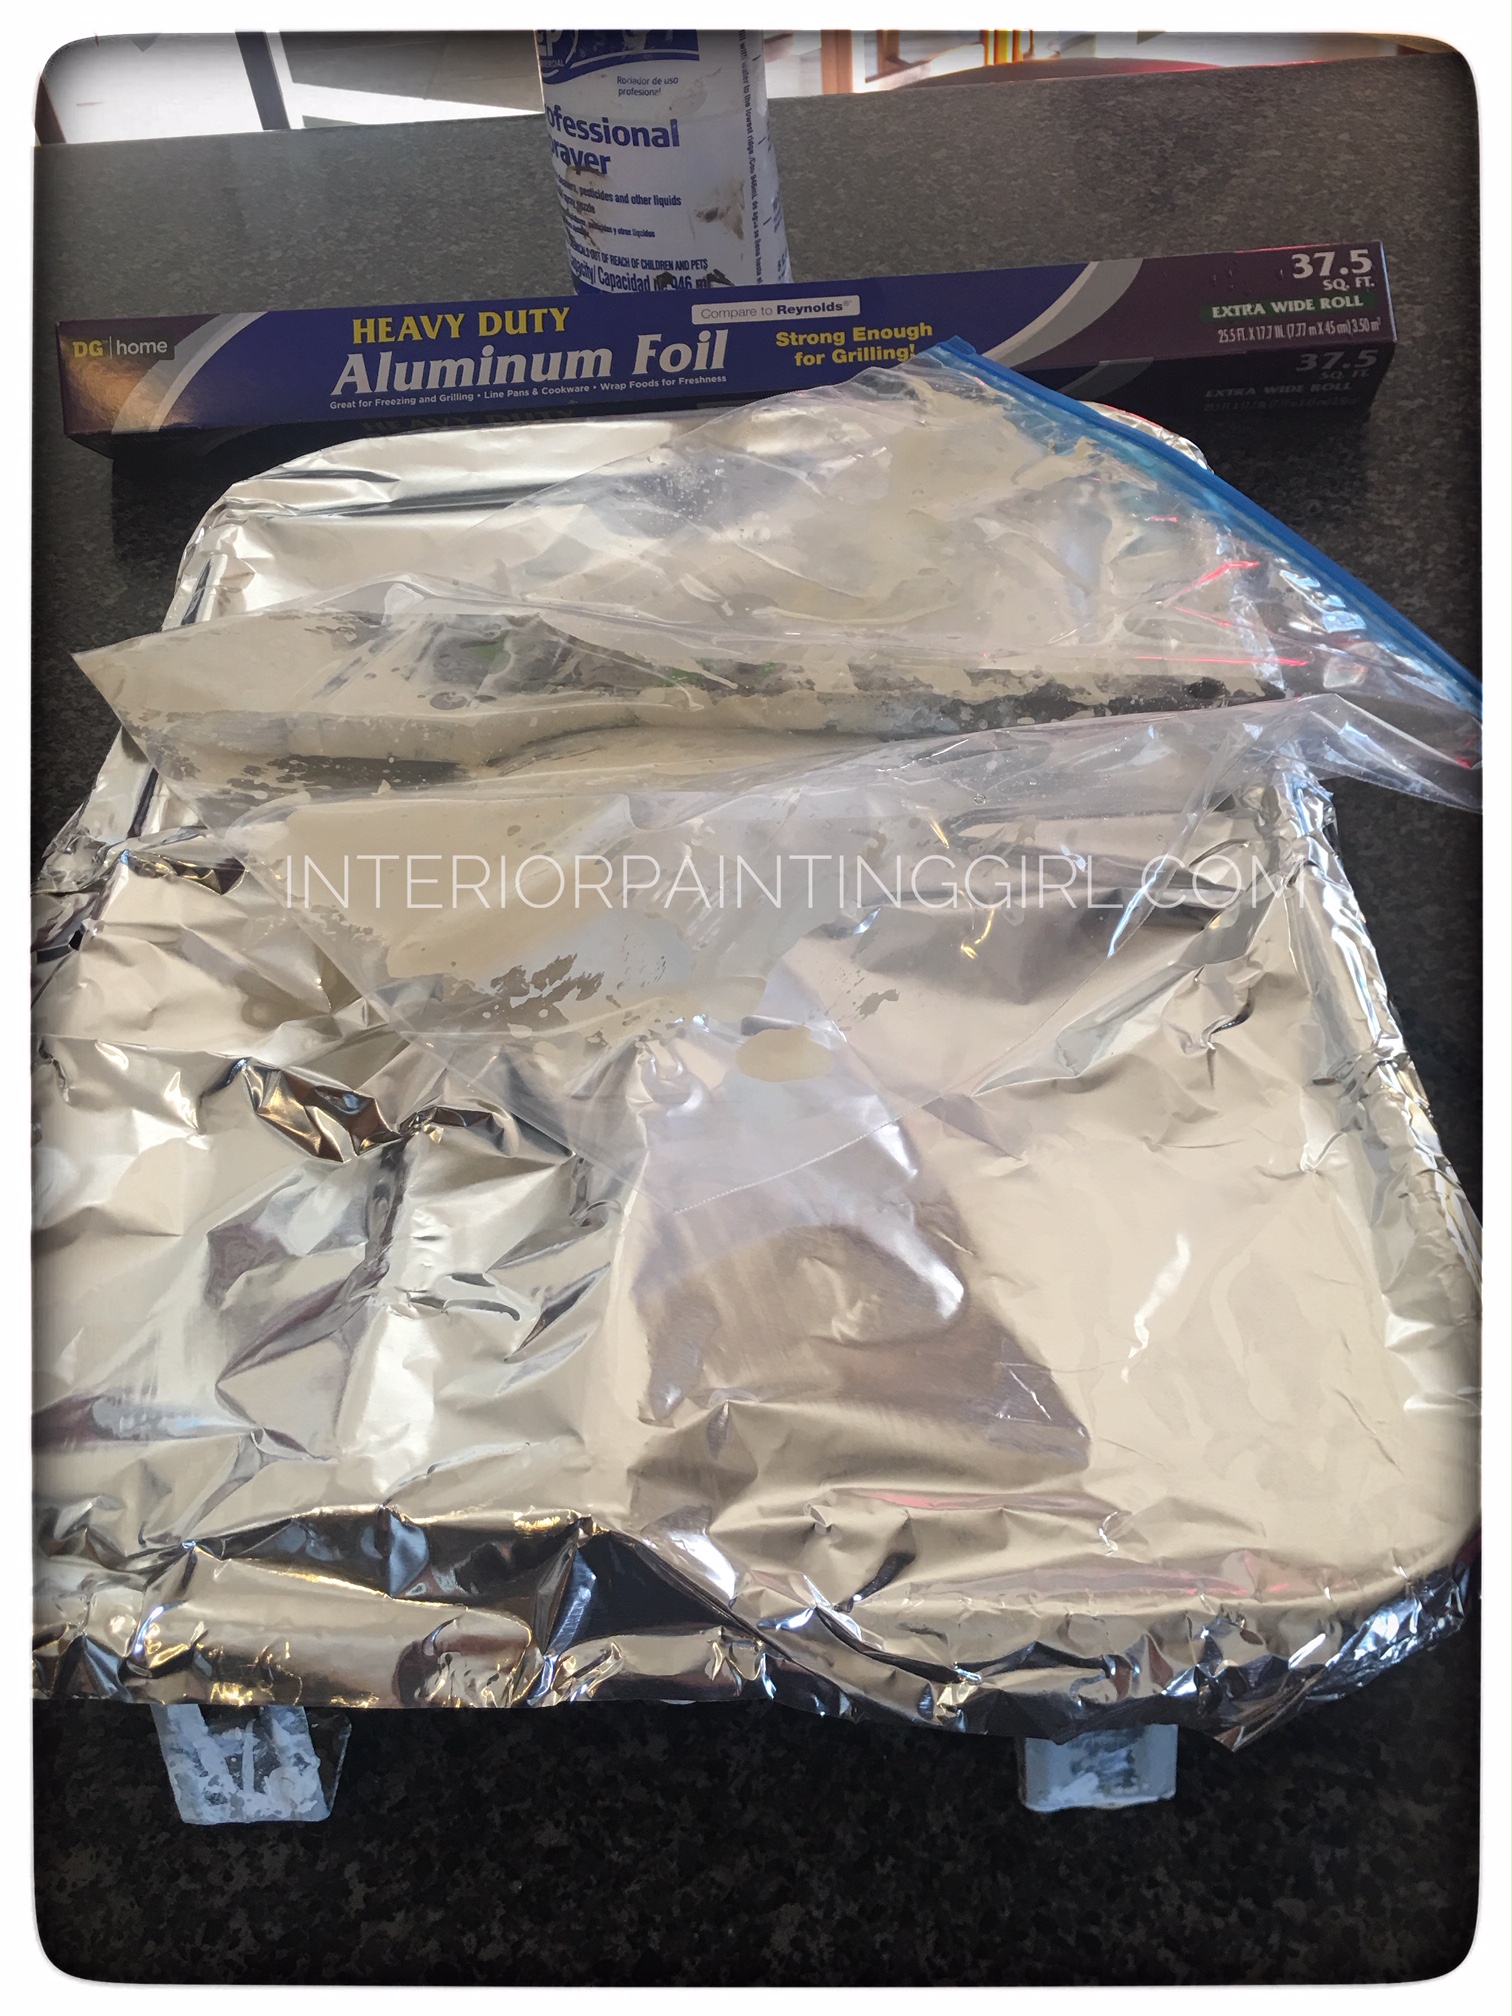
Tip #11: Wrap, Don’t Wash
This is one of the biggest time-saving interior painting tips I know.
Most painting projects require more than a single day of work. And sometimes you have only a couple hours here or there to work on your project, right?
That means the tedious effort of cleaning up supplies each and every time. Washing and brushing out your paint brushes. Scrub the rollers and rinse out the roller pans.
No…not really. If you intend to use the same colors and supplies the following day (or even a couple of days later), you don’t necessarily have to wash your supplies.
You DO have to wrap them thoroughly, keep air off them, and keep them wet.
Wrap your wet brushes and rollers or paint pails in plastic wrap or Ziploc bags. Cover them over with aluminum foil. The important thing is to keep air off them, much the way you would keep a cake or bread from drying out in the air.
This way you only need to go through the time-consuming tedium of washing up your supplies between colors, or at the end of the job.
Tip #12 : Avoid Common Mistakes
Learn about these ten common Interior Painting Mistakes and how to avoid them!
With the right frame of mind, I know these interior painting tips will help make your next painting project smoother, less stressful, and the talk of the neighborhood!
For step-by-step instructions on how to paint walls, ceilings, trim, and everything else, check out our Interior Painting Guide!

"I did not know how to paint or even what to paint, but I knew I had to begin." Margaret Atwood, Cat's Eye
Join my monthly email newsletter, "Dip & Swipe", for professional tips, how-to articles, color and decorating ideas, projects, and much more!
Recent Articles
-
Repurpose Old Windows
Dec 10, 21 06:32 PM
 Learn how to repurpose old windows by upcycling them into shabby chic decor.
 -
Upcycling a Toolbox
Dec 08, 21 10:22 PM
 In this craft painting project, I upcycle an old toolbox with fresh paint and an appliqué.
 -
Craft Painting Projects
Dec 08, 21 08:13 PM
 A place for all of my smaller craft painting projects and DIY projects that don't fit elsewhere.
Follow me on Pinterest @