Painting Trim
Painting Trim is often an afterthought but it is a critical piece of most interior painting projects. Trim has a tremendous impact on the overall look and feel of a room. It can provide architectural detail, highlight or provide contrast with wall colors or décor, and make windows and doors “pop”.
It is a common mistake to overlook painting trim when undertaking a painting or renovation project.
That doesn’t mean that trim ALWAYS needs to be painted when repainting a room or space. I am an admirer of natural wood or wood-finish trim, especially vintage trim with its character and fine architectural detail.
But if you’re like most of us you probably have standard white or unfinished trim around doors, windows, and baseboards, and every once in a while it’s necessary to refresh or reinvigorate these surfaces.
They take a beating! Vacuums, brooms, furniture, children, and any number of other things can nick, scuff, dent, mark, and mar these surfaces. Even brand new trim is pockmarked with nail holes and scuffs when it’s installed and needs some TLC to get back looking its best.
Follow this step-by-step guide to painting trim:
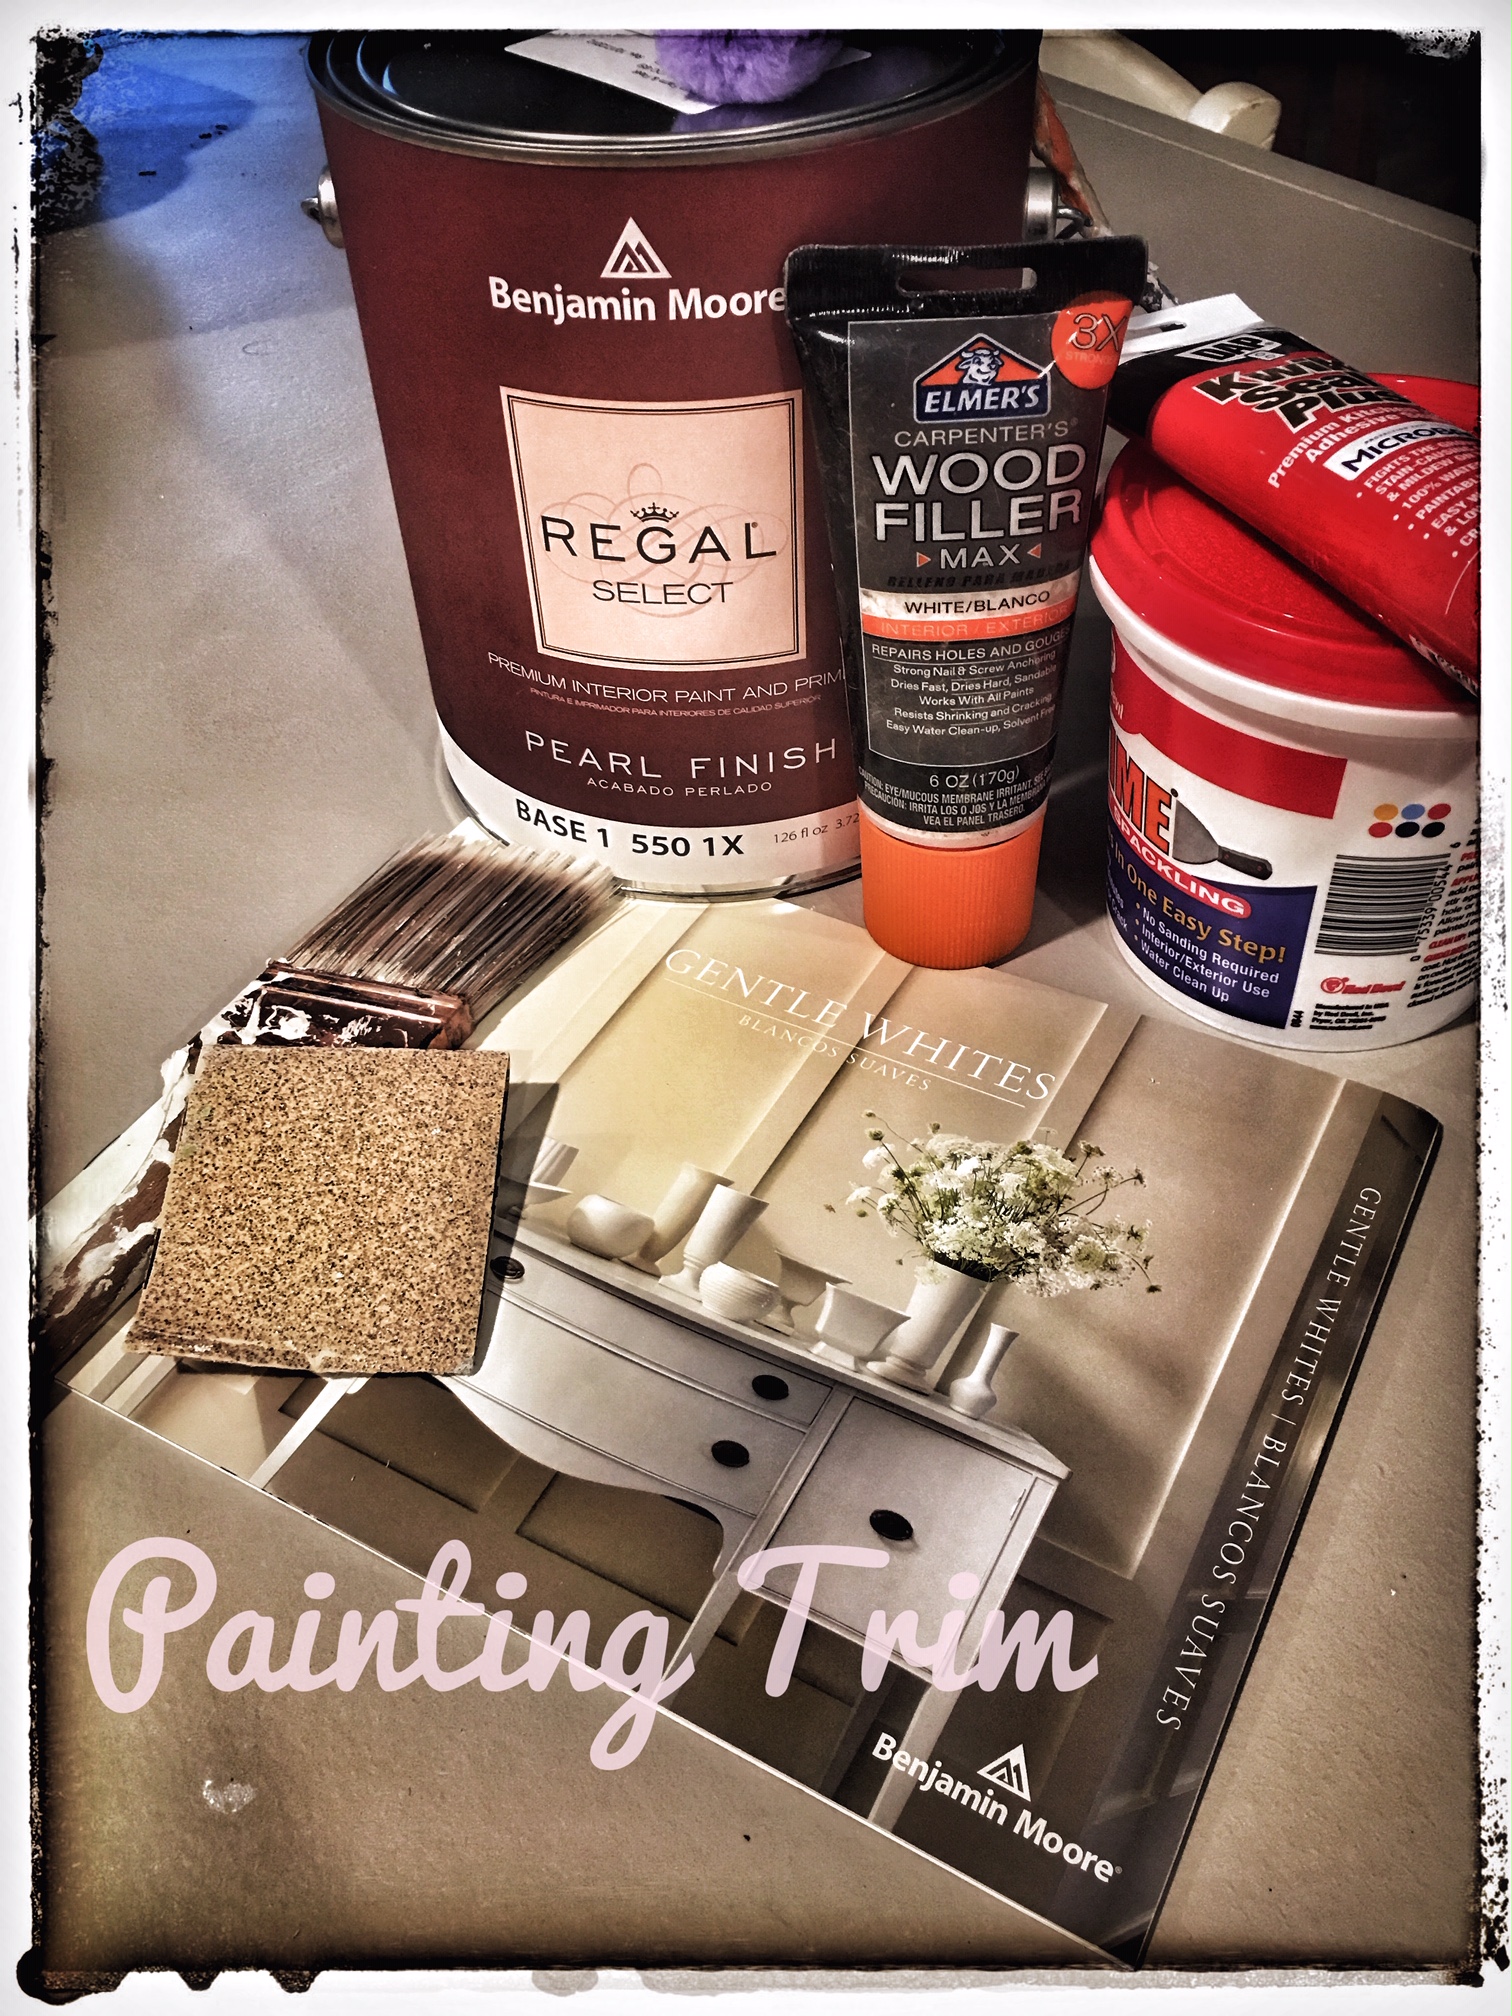
Painting Trim Supply List
Paint Supplies:
- Interior Latex Paint in the color and sheen of your choice (more discussion on sheen in Step 7)
- A Water-Based Stain-Blocking Primer (such as KILZ Adhesion)
Note: If you are painting directly over previously painted trim in the same or a darker color you can use a paint & primer in one and avoid the separate priming step. If you are painting on raw wood, over spackling repairs, in a lighter color than the original, or over stains you should follow the priming steps laid out below.
Necessary Trim Painting Tools:
- 2” Wide Painter’s Tape
- 1.5 – 2” Nylon-Poly Paint Brush
- All-Purpose Sanding Sponge (120 Grit)
- Lightweight Spackling Compound
- Putty or Spackling Knife
- All Purpose Paintable Caulk
- A Paint Cup or small bucket
Painting Trim Step-by-Step
Step 1 : Clean
The first step before painting trim is to clean it.
Trim is touched, handled, splashed on, colored on. It collects dust and oils and fingerprints and shoe scuffs.
A damp sponge and scrubbing pad with a simple dilute solution of water and dish soap is usually perfect.
Use the scrubbing pad along the top edge of the trim to remove accumulated grime and any oily or greasy spots where hands or pets frequently touch.
Trim in a kitchen or bathroom where oils, moisture, hairspray, or other contaminates are frequently present may require some extra cleaning or effort.
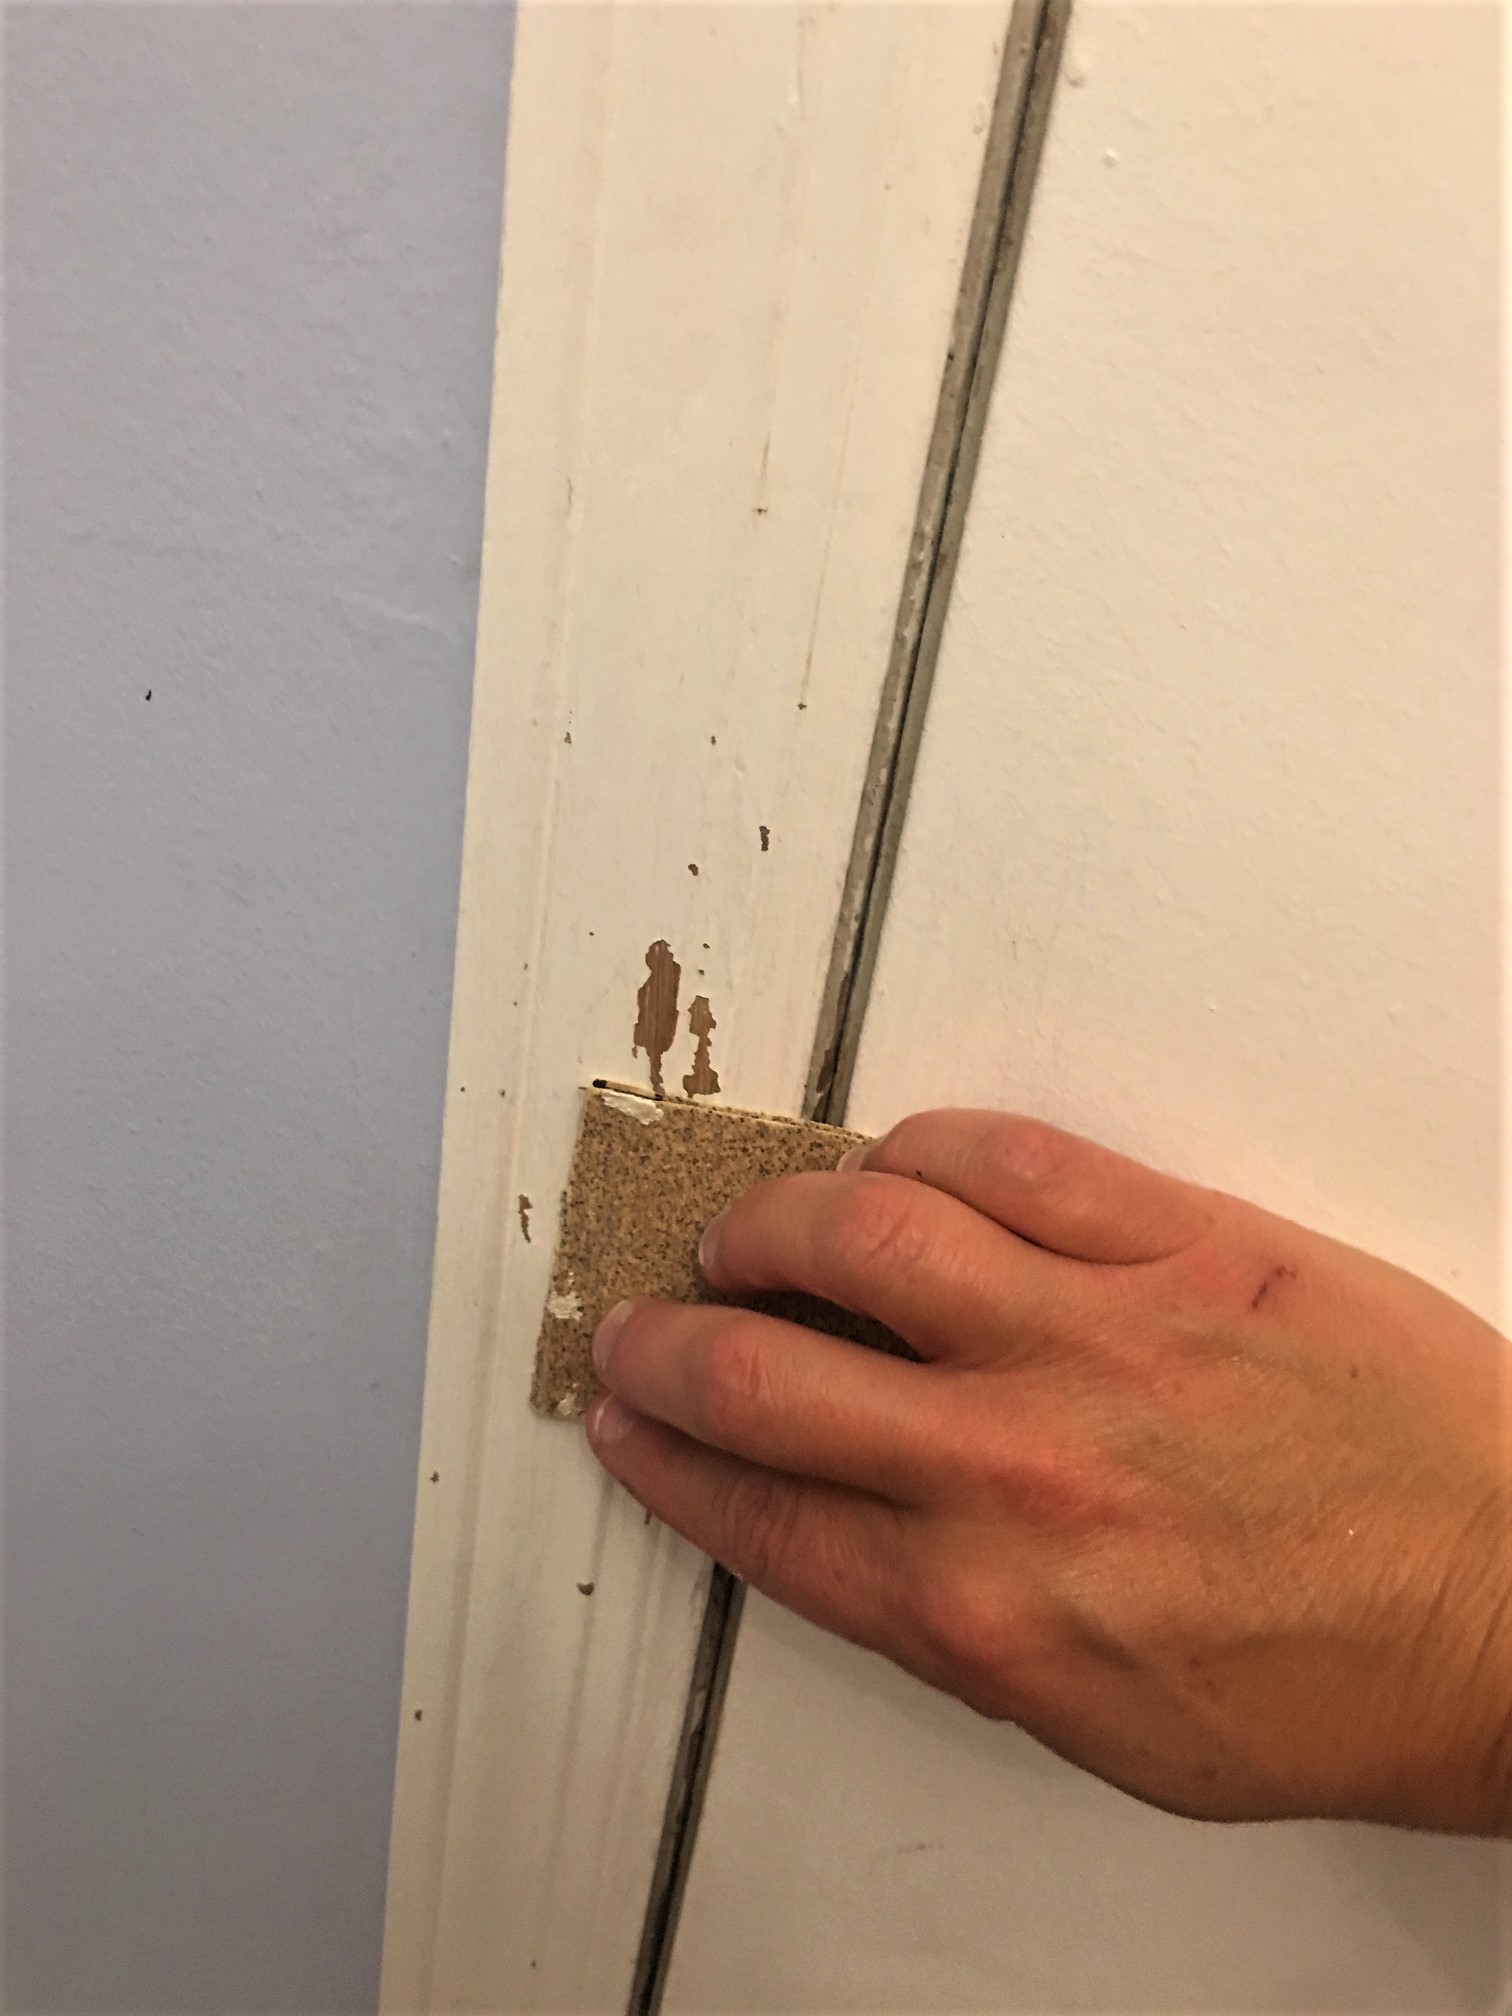
Step 2 : First Sanding
The next requirement in painting trim is to sand. Sanding is important for both the durability and quality of the final paint finish. The first sanding is primarily to remove the glossiness of the wood and even out any damaged or rough wood.
If you are painting trim that is new or already smooth, a single pass with a 125-grit sanding sponge should be sufficient.
If your trim is old and scuffed or worn, start with a coarser grit sandpaper to remove old layers and uneven spots of paint or rough wood, then finish with a 125-grit sanding sponge to smooth the surface.
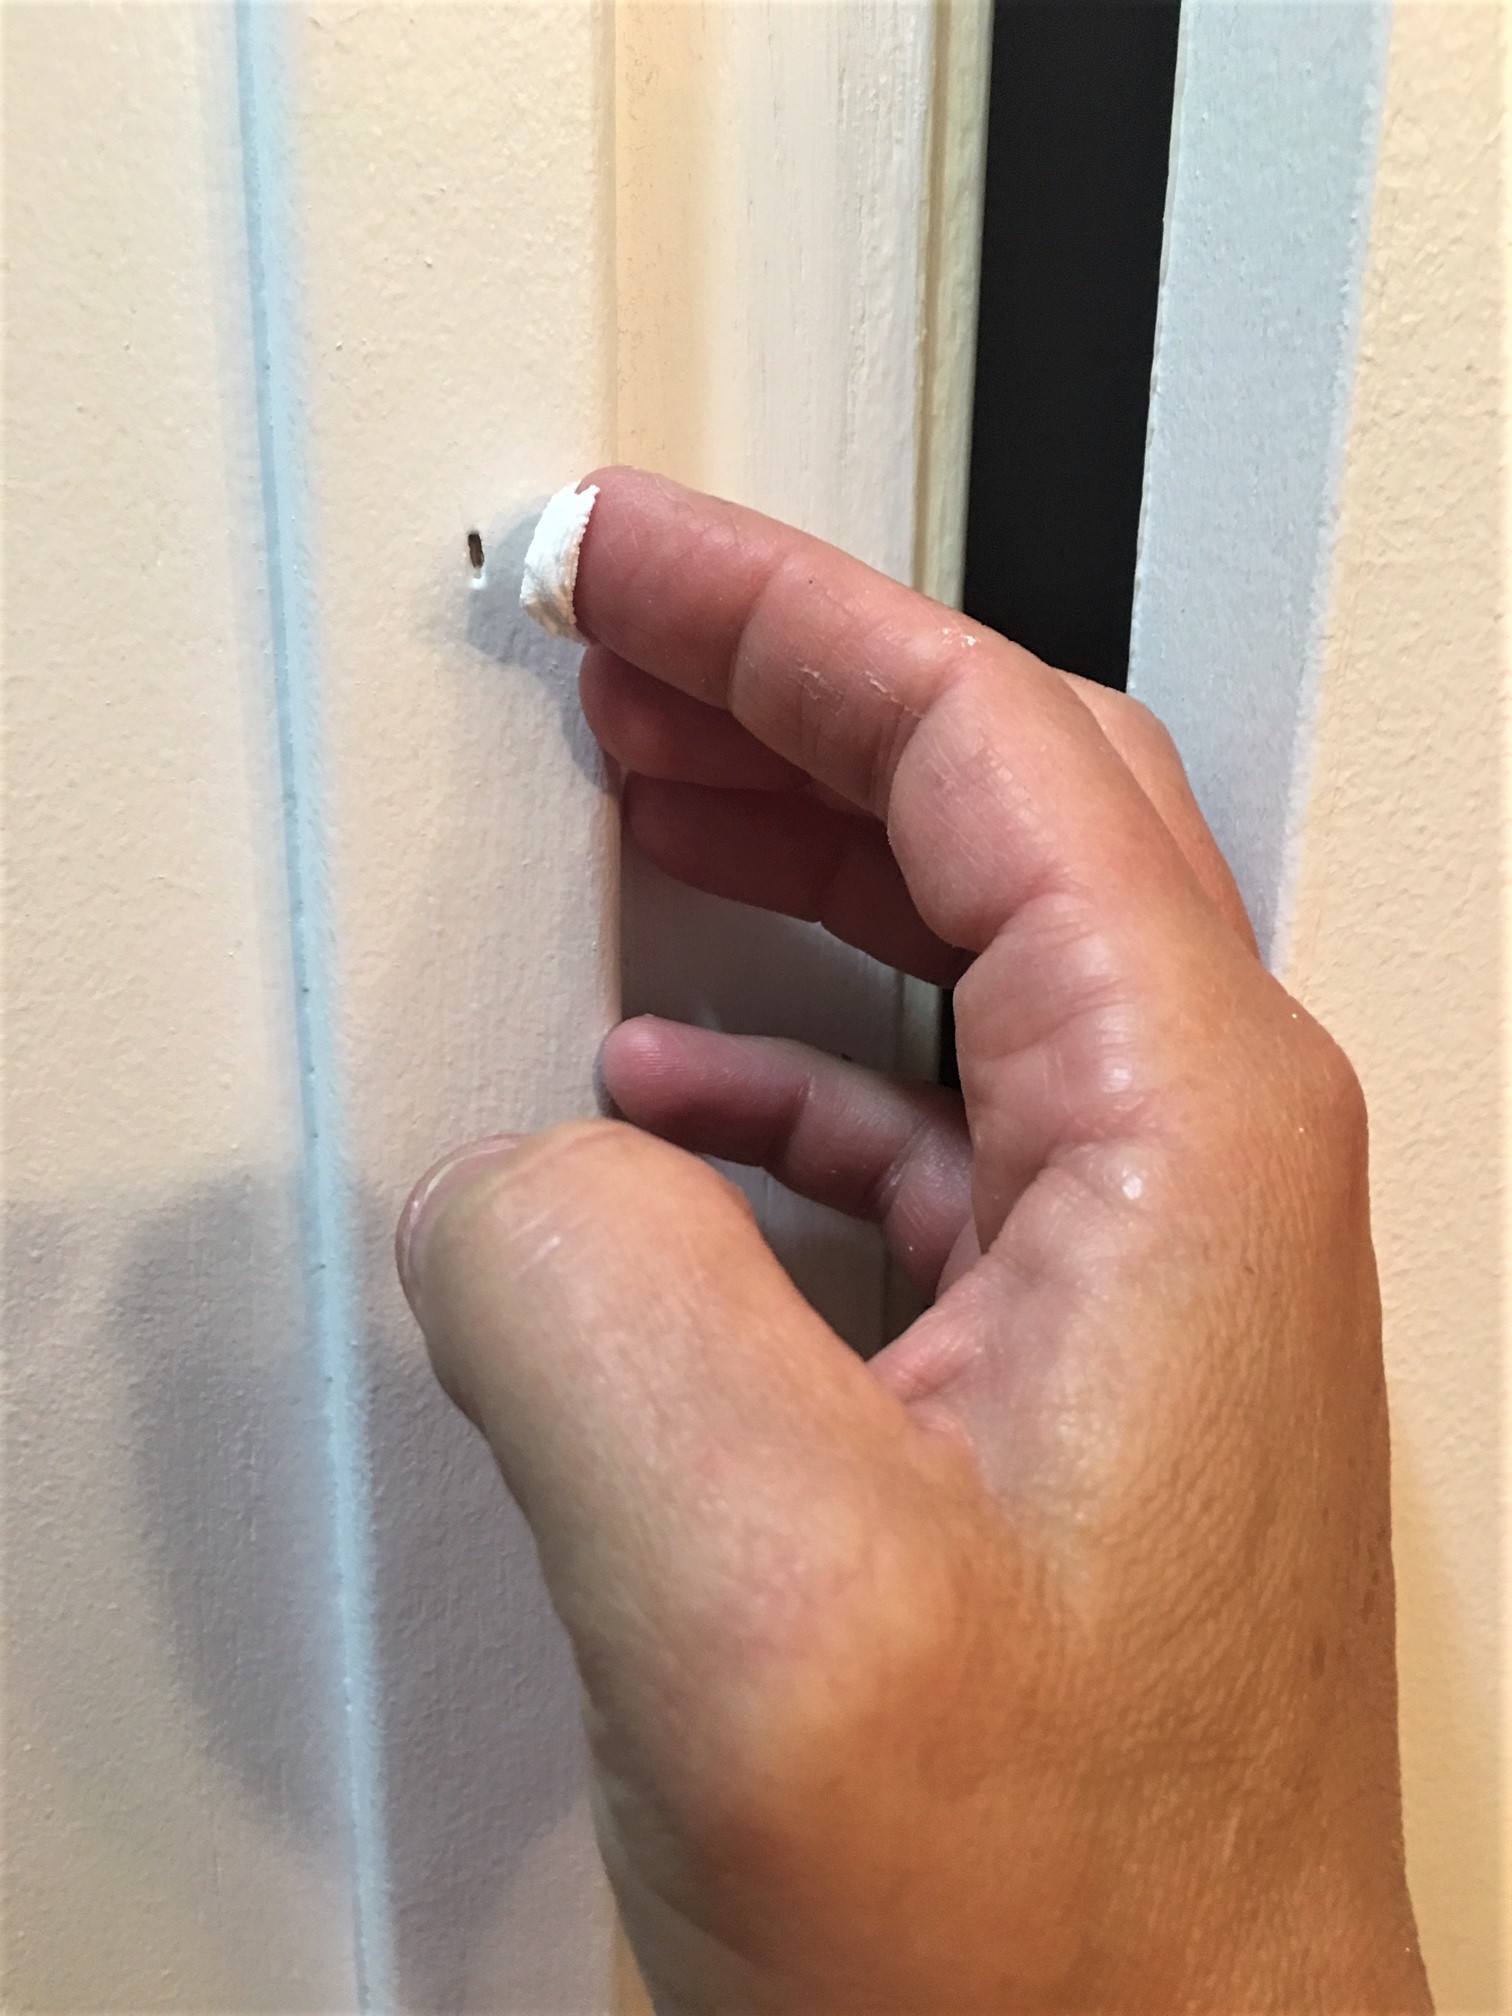
Step 3 : Repairing Trim
All trim, even brand new trim, has its share of imperfections. Trim is generally attached to the walls with nails or brads, which often leave small holes or divots. Bumps, chips, nicks, and dents need to be filled and sanded smooth before moving on to the next steps in painting trim
Lightweight spackle is an easy product to use for this, though wood filler can also be used.
Shine a work light or flashlight at an angle across the surface of your trim to look for dents or divots that are not extremely visible to the naked eye (they may be VERY visible after paint has been applied!)
Use a putty knife or a fingertip to press spackle or wood filler into the holes, divots, dents, etc…
Allow spackling or filler to dry per the manufacturer’s instructions – usually 2 hours for spackle, though this can vary depending upon the depth of the holes and the temperature and humidity of the space.
Once the spackle is dry, lightly sand the repaired areas flush with the surrounding trim with 120 or 150 grit sandpaper.
Wipe down or vacuum up any dust with a sponge, tack cloth, or vacuum with a brush attachment.
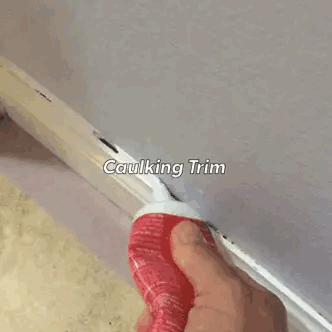
Step 4 : Caulking Gaps
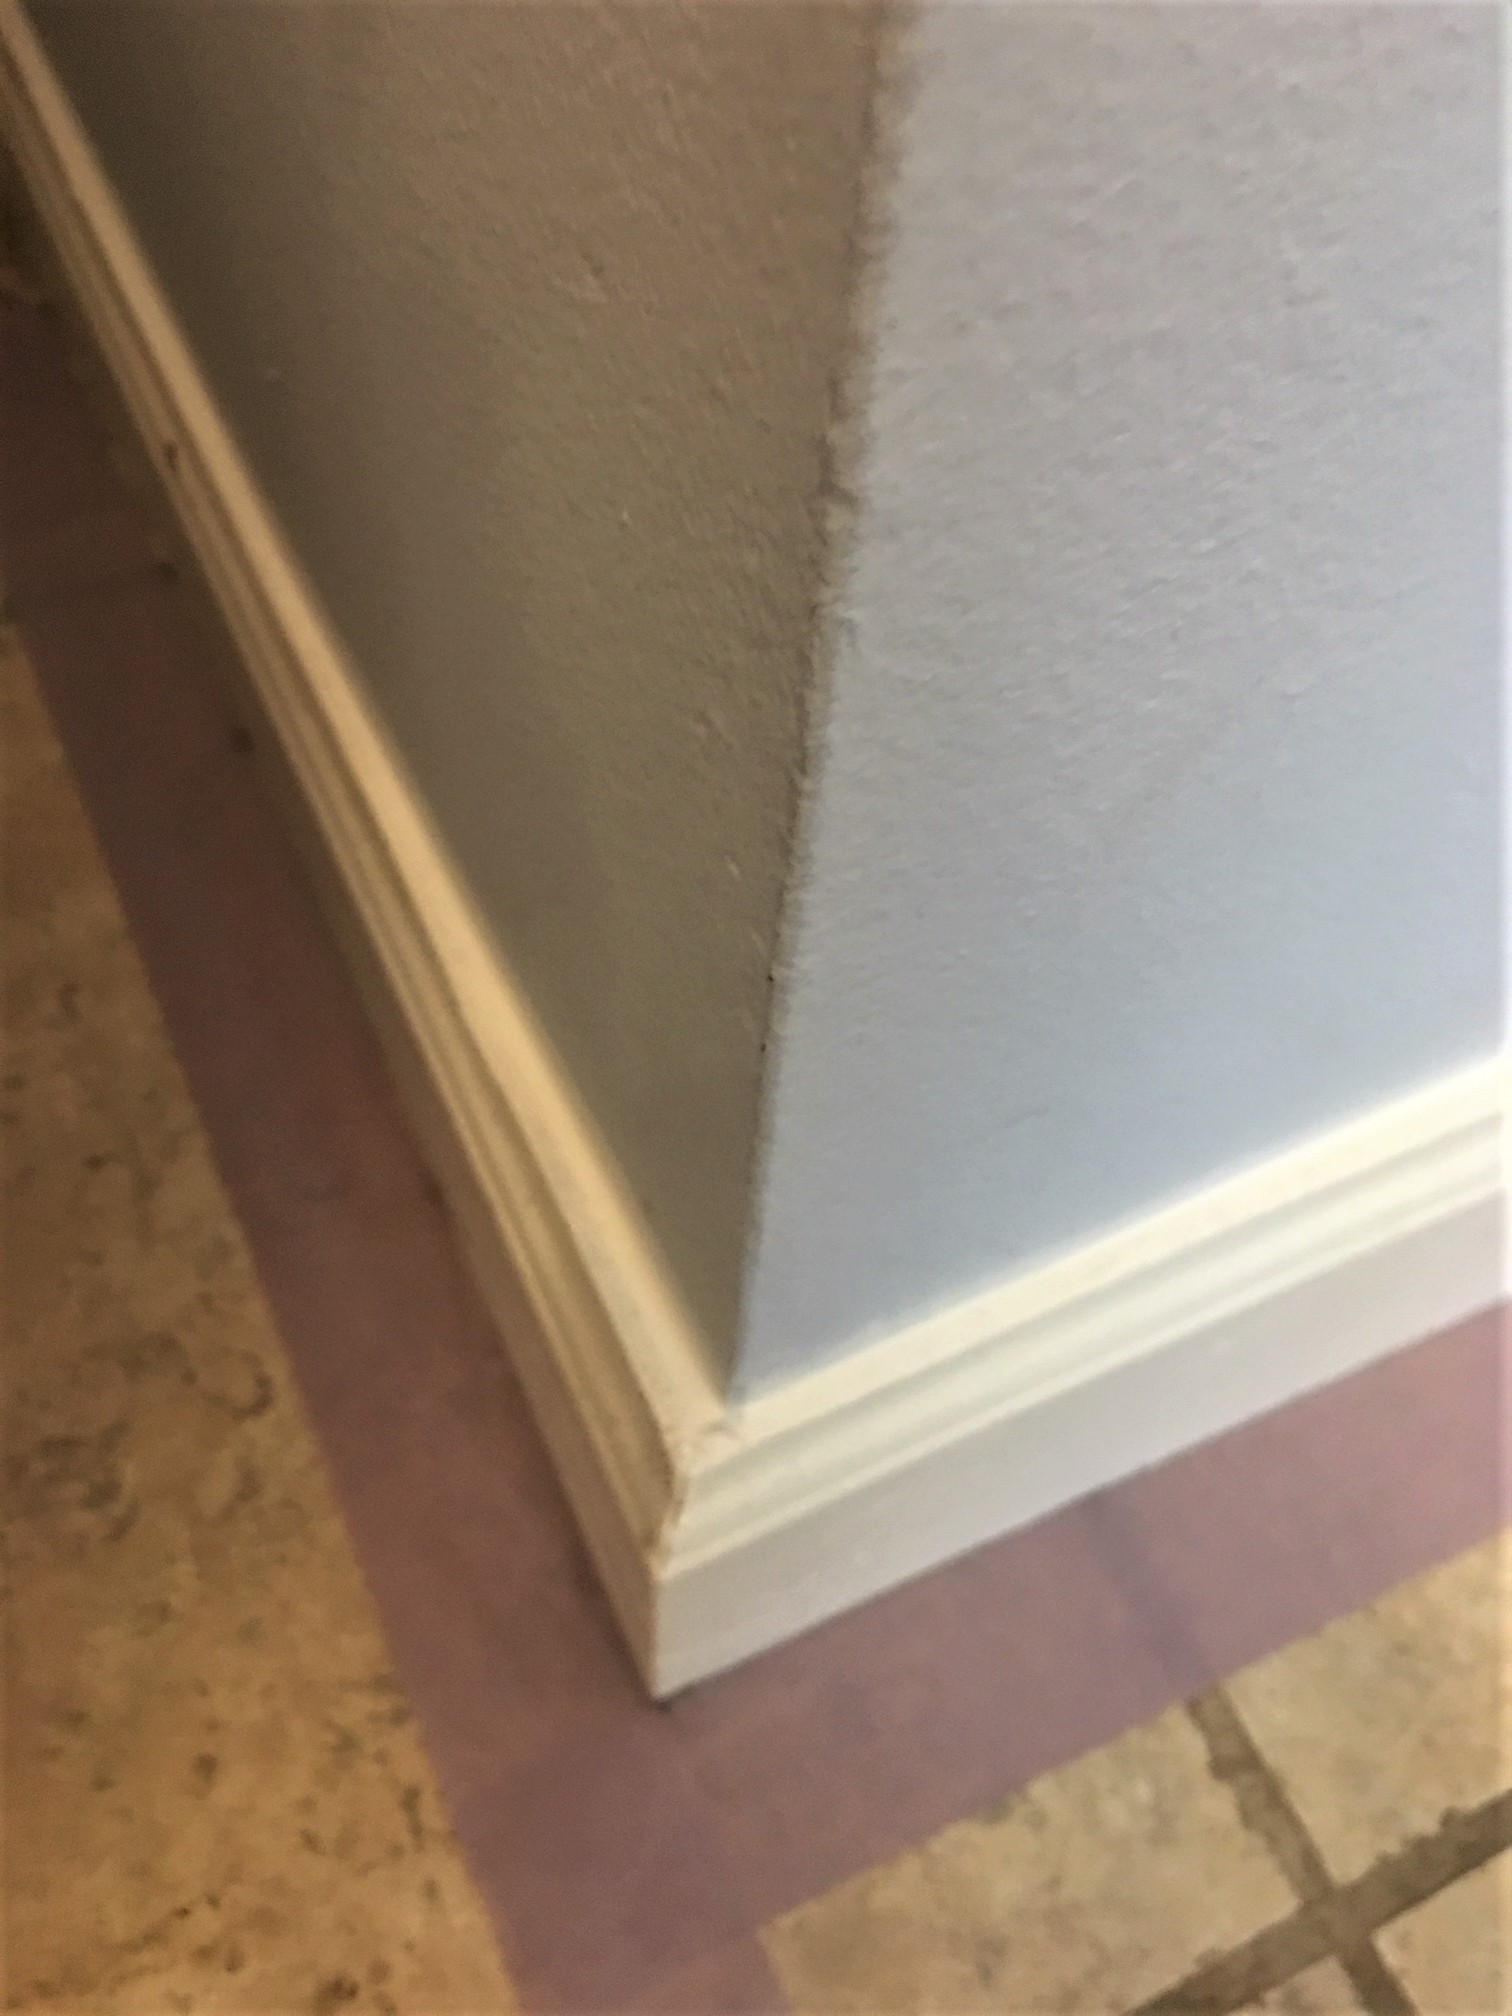
One key to painting trim is to fill in all the gaps with caulk. Trim is imperfect and so are the walls and floors it is attached to.
It is a rare thing indeed for a long run of trim to sit perfectly against the wall because drywall or plaster is bound to have irregularities.
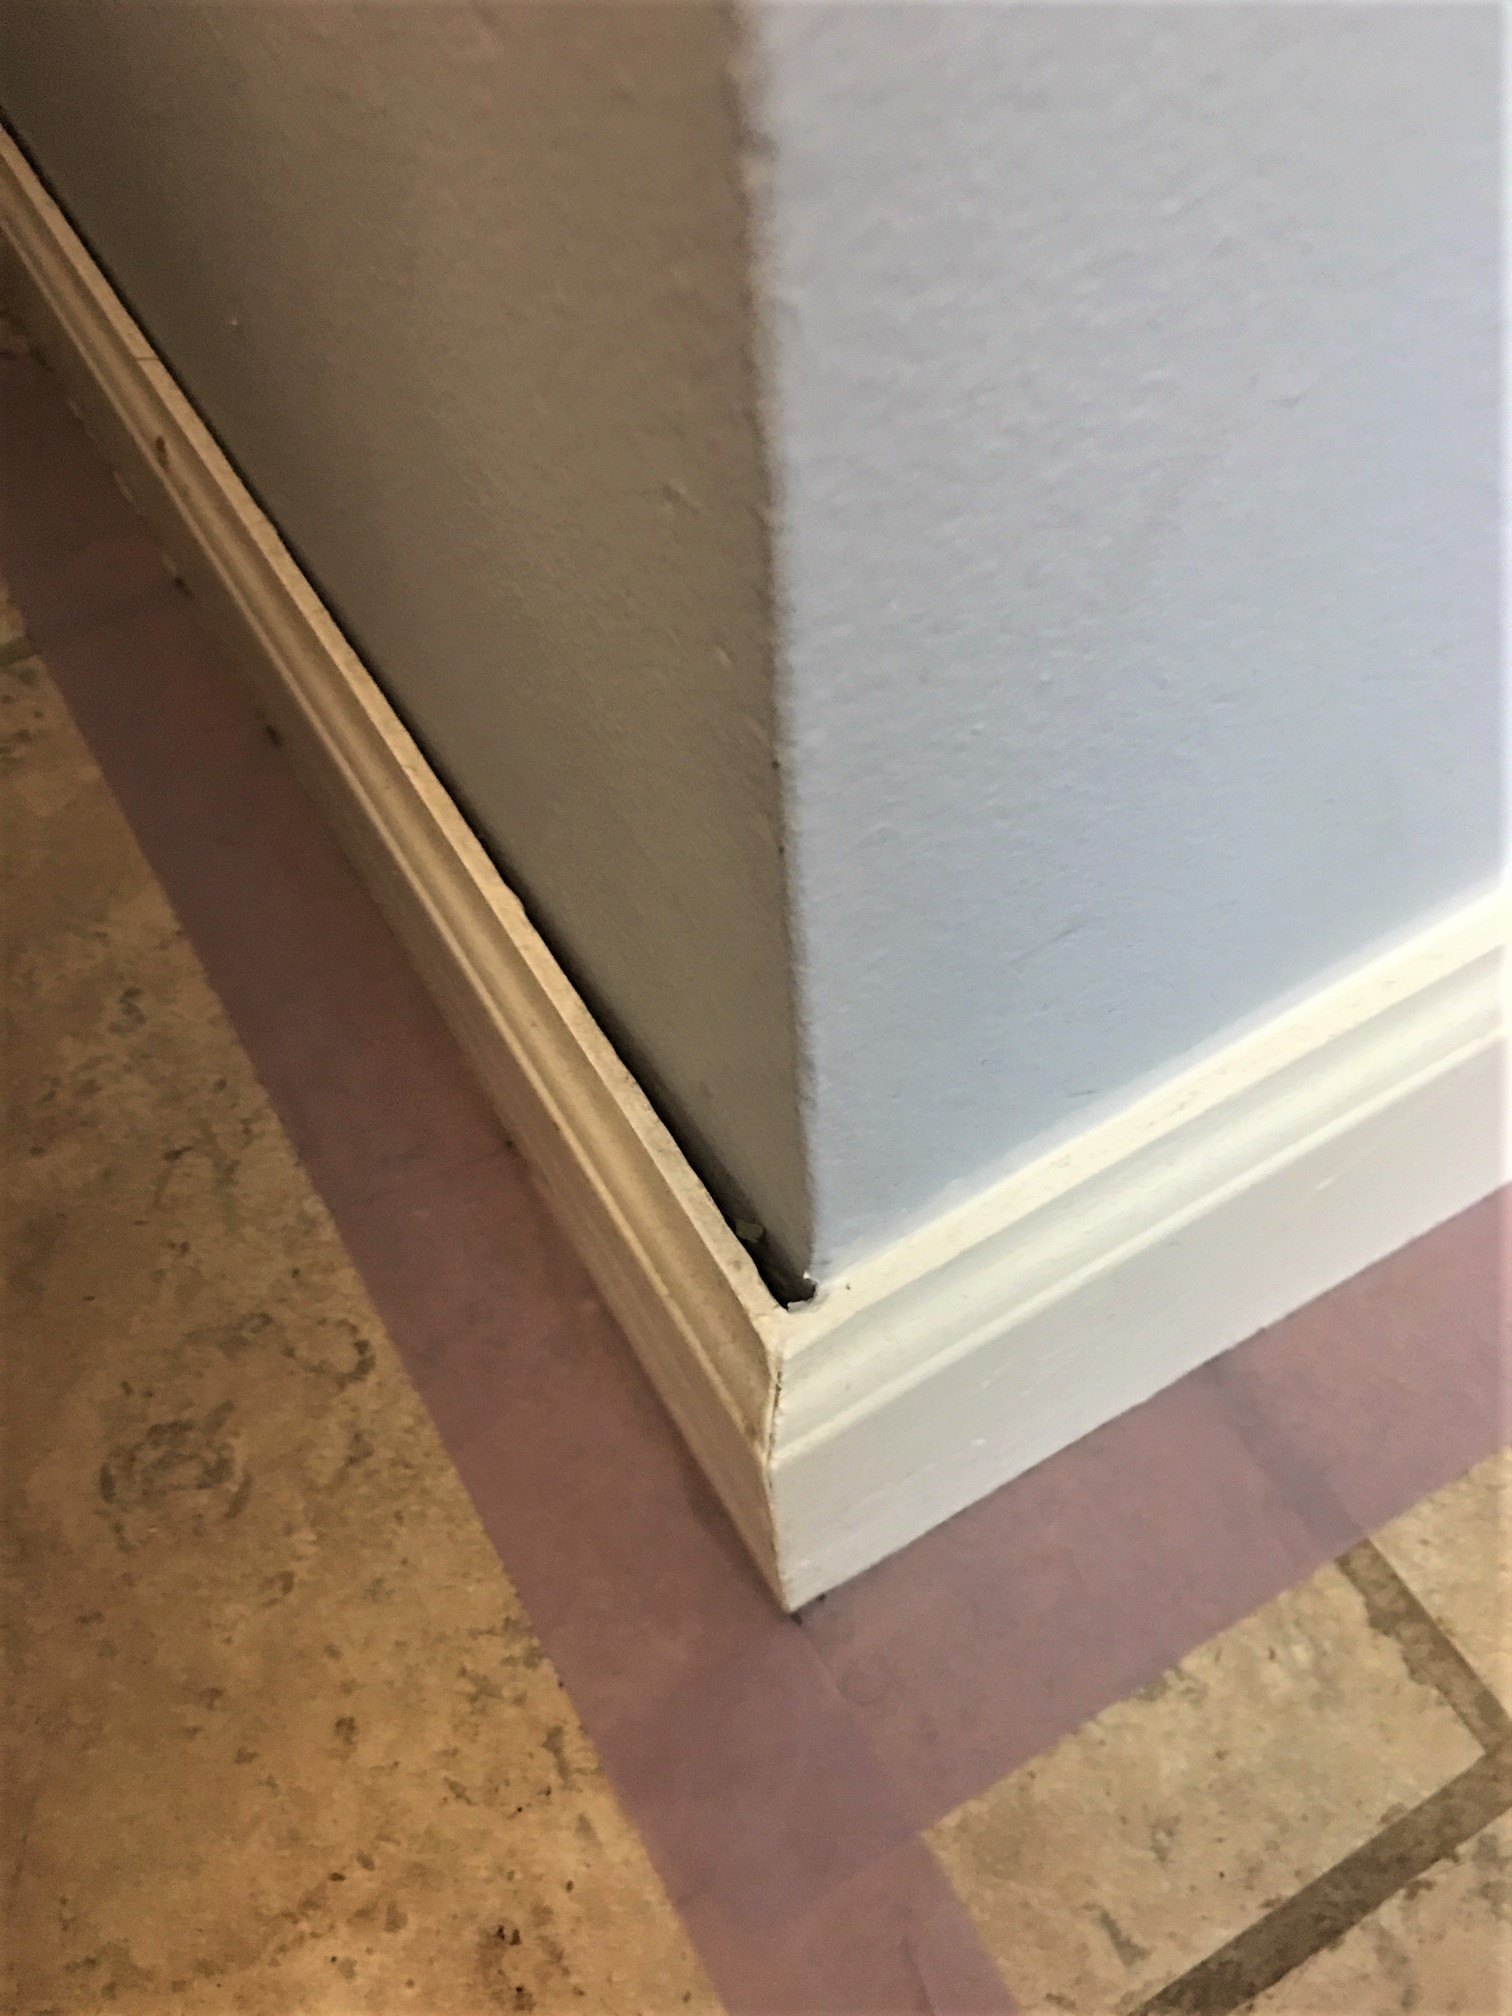
And every seam and joint is another potential gap where trim will not meet perfectly to its adjoining surface.
Trim work can be made to look considerably more complete and seamless by using paintable caulk to fill in all these small gaps.
Cut a narrow opening in the head of the caulk applicator and apply caulk cautiously into any and all gaps in your trim. Wipe away any excess caulk immediately with a damp cloth.
I suggest using a squeeze caulk applicator. I think they are easier to work with and control, but if you're good with a caulk gun by all means use the method you're most comfortable with!
If the caulk has dispensed unevenly you can smooth it by pressing it into the gap with a moistened finger and wiping away excess with a damp cloth.
Be sure to allow the caulk to cure per the manufacturer's instruction before moving onto the next step. Applying tape before it has cured could pull the caulk back out of the gap when it's removed.
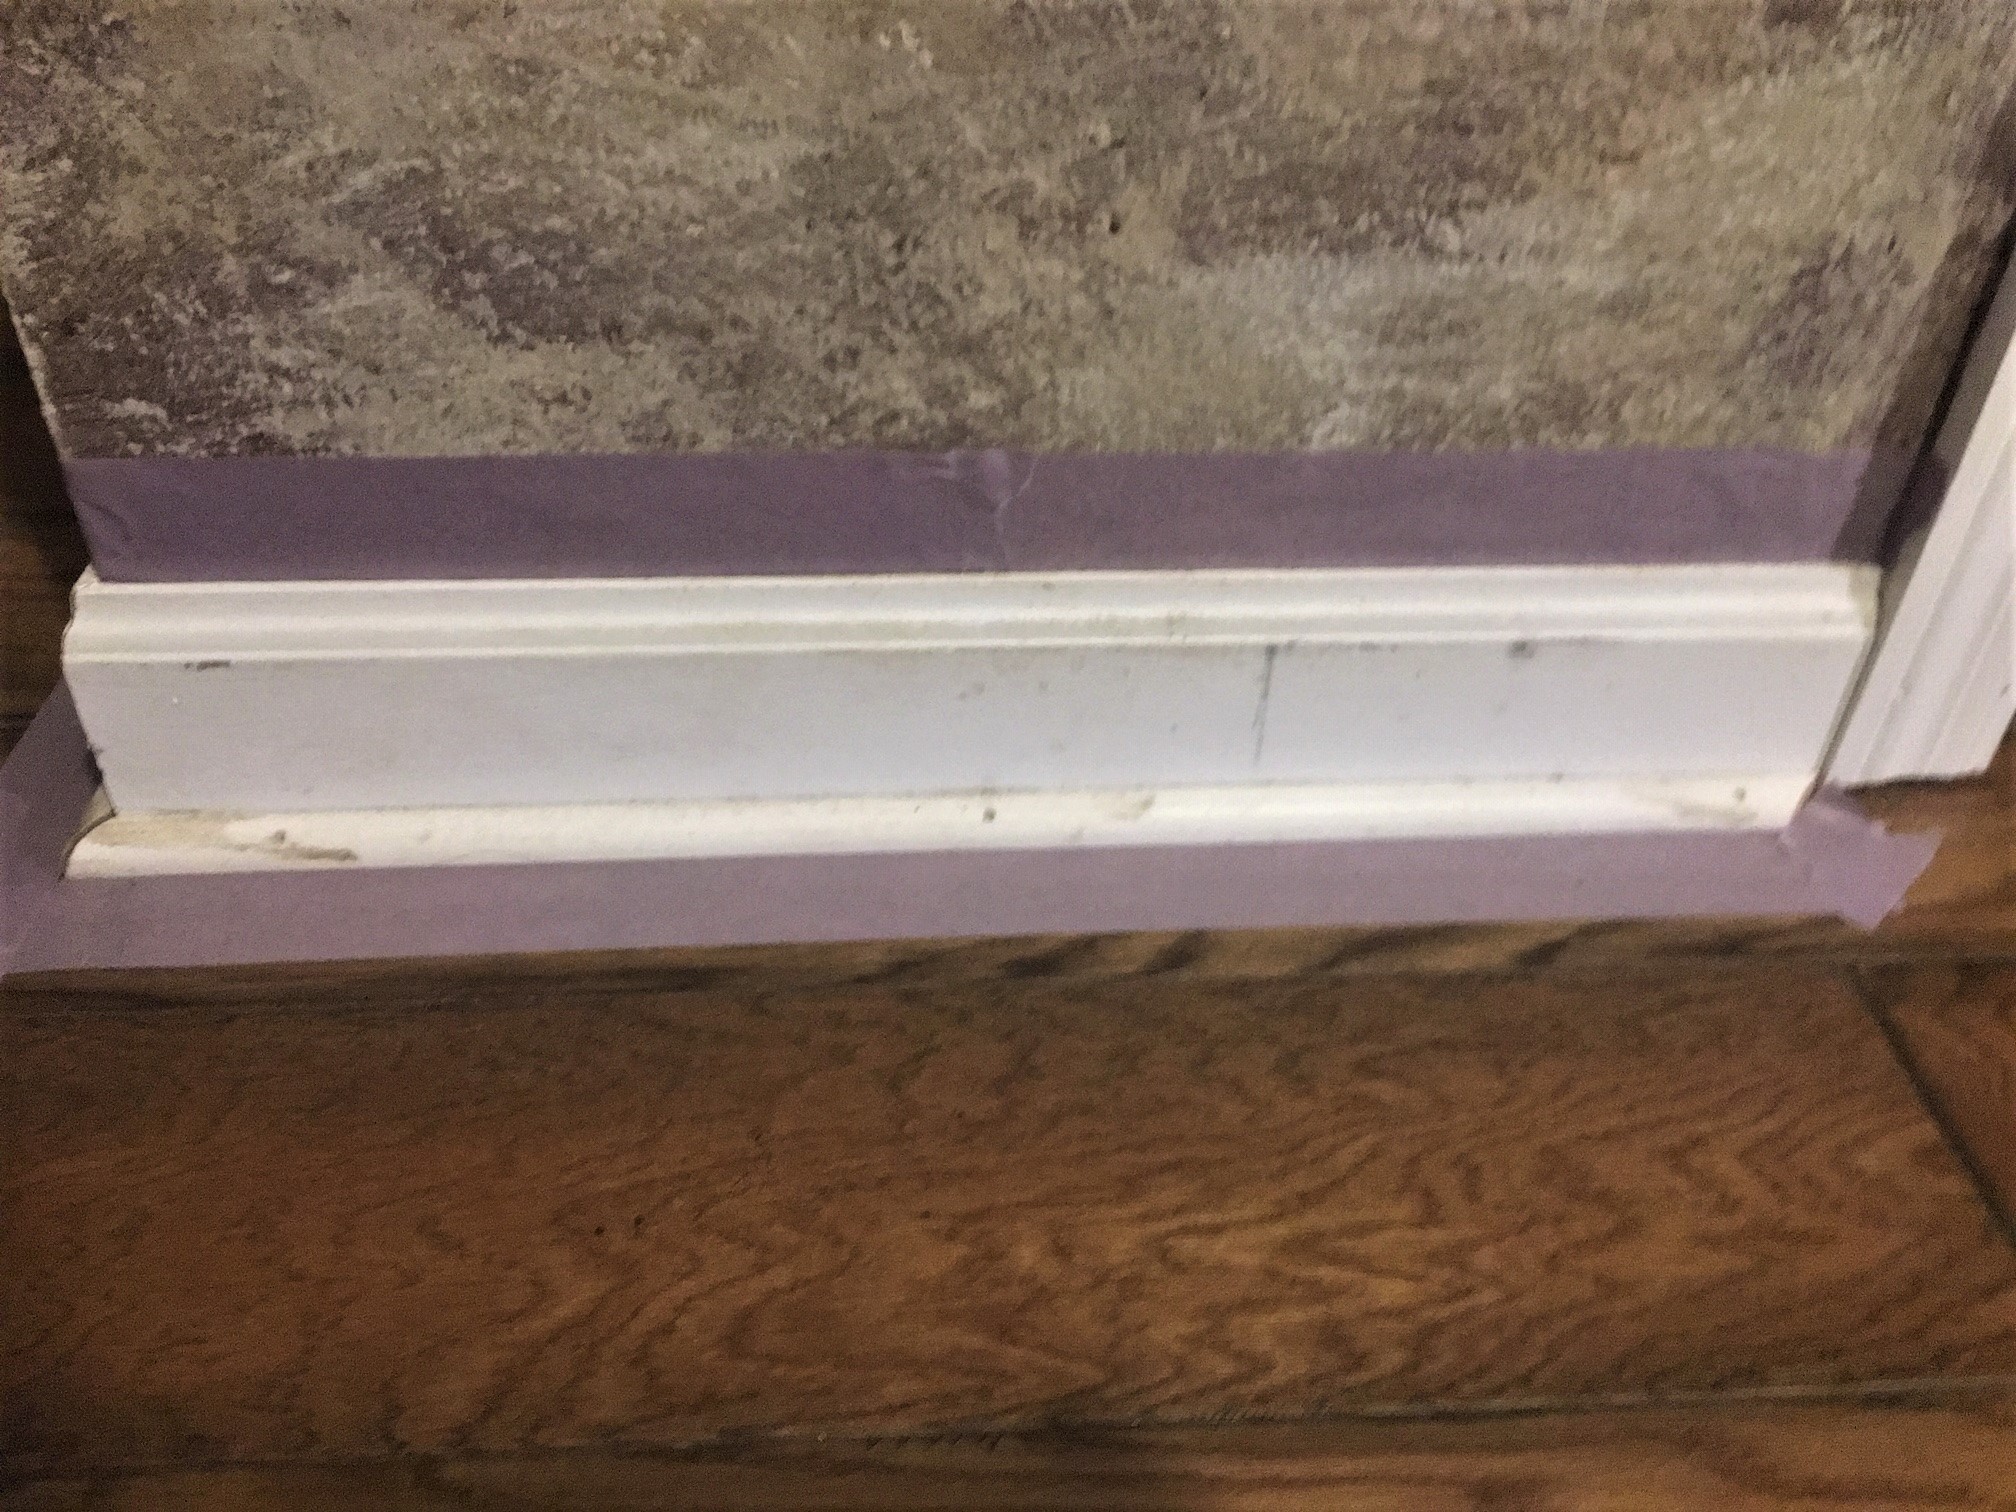
Step 4 : Taping Off
Now that you’ve sanded and repaired the imperfections, it’s almost time to apply primer and start painting trim.
But first you need to protect your walls and floors!
Apply 2” wide painter’s tape along the seam between your trim and walls as well as along your trim and flooring. Be sure and use delicate painter’s tape if your walls are freshly painted.
Tip: Apply a few inches of painter’s tape to a corner of the wall. Press it firmly to adhere it to the surface. Then move in 6-10” sections across the length of your surface, positioning and pressing the tape firmly to the surface as you go.
Once you have taped off an entire section or area, go back with a putty knife and press along the sealing seam to ensure a good seal, otherwise paint could still leak behind the tape onto the wall or floor.
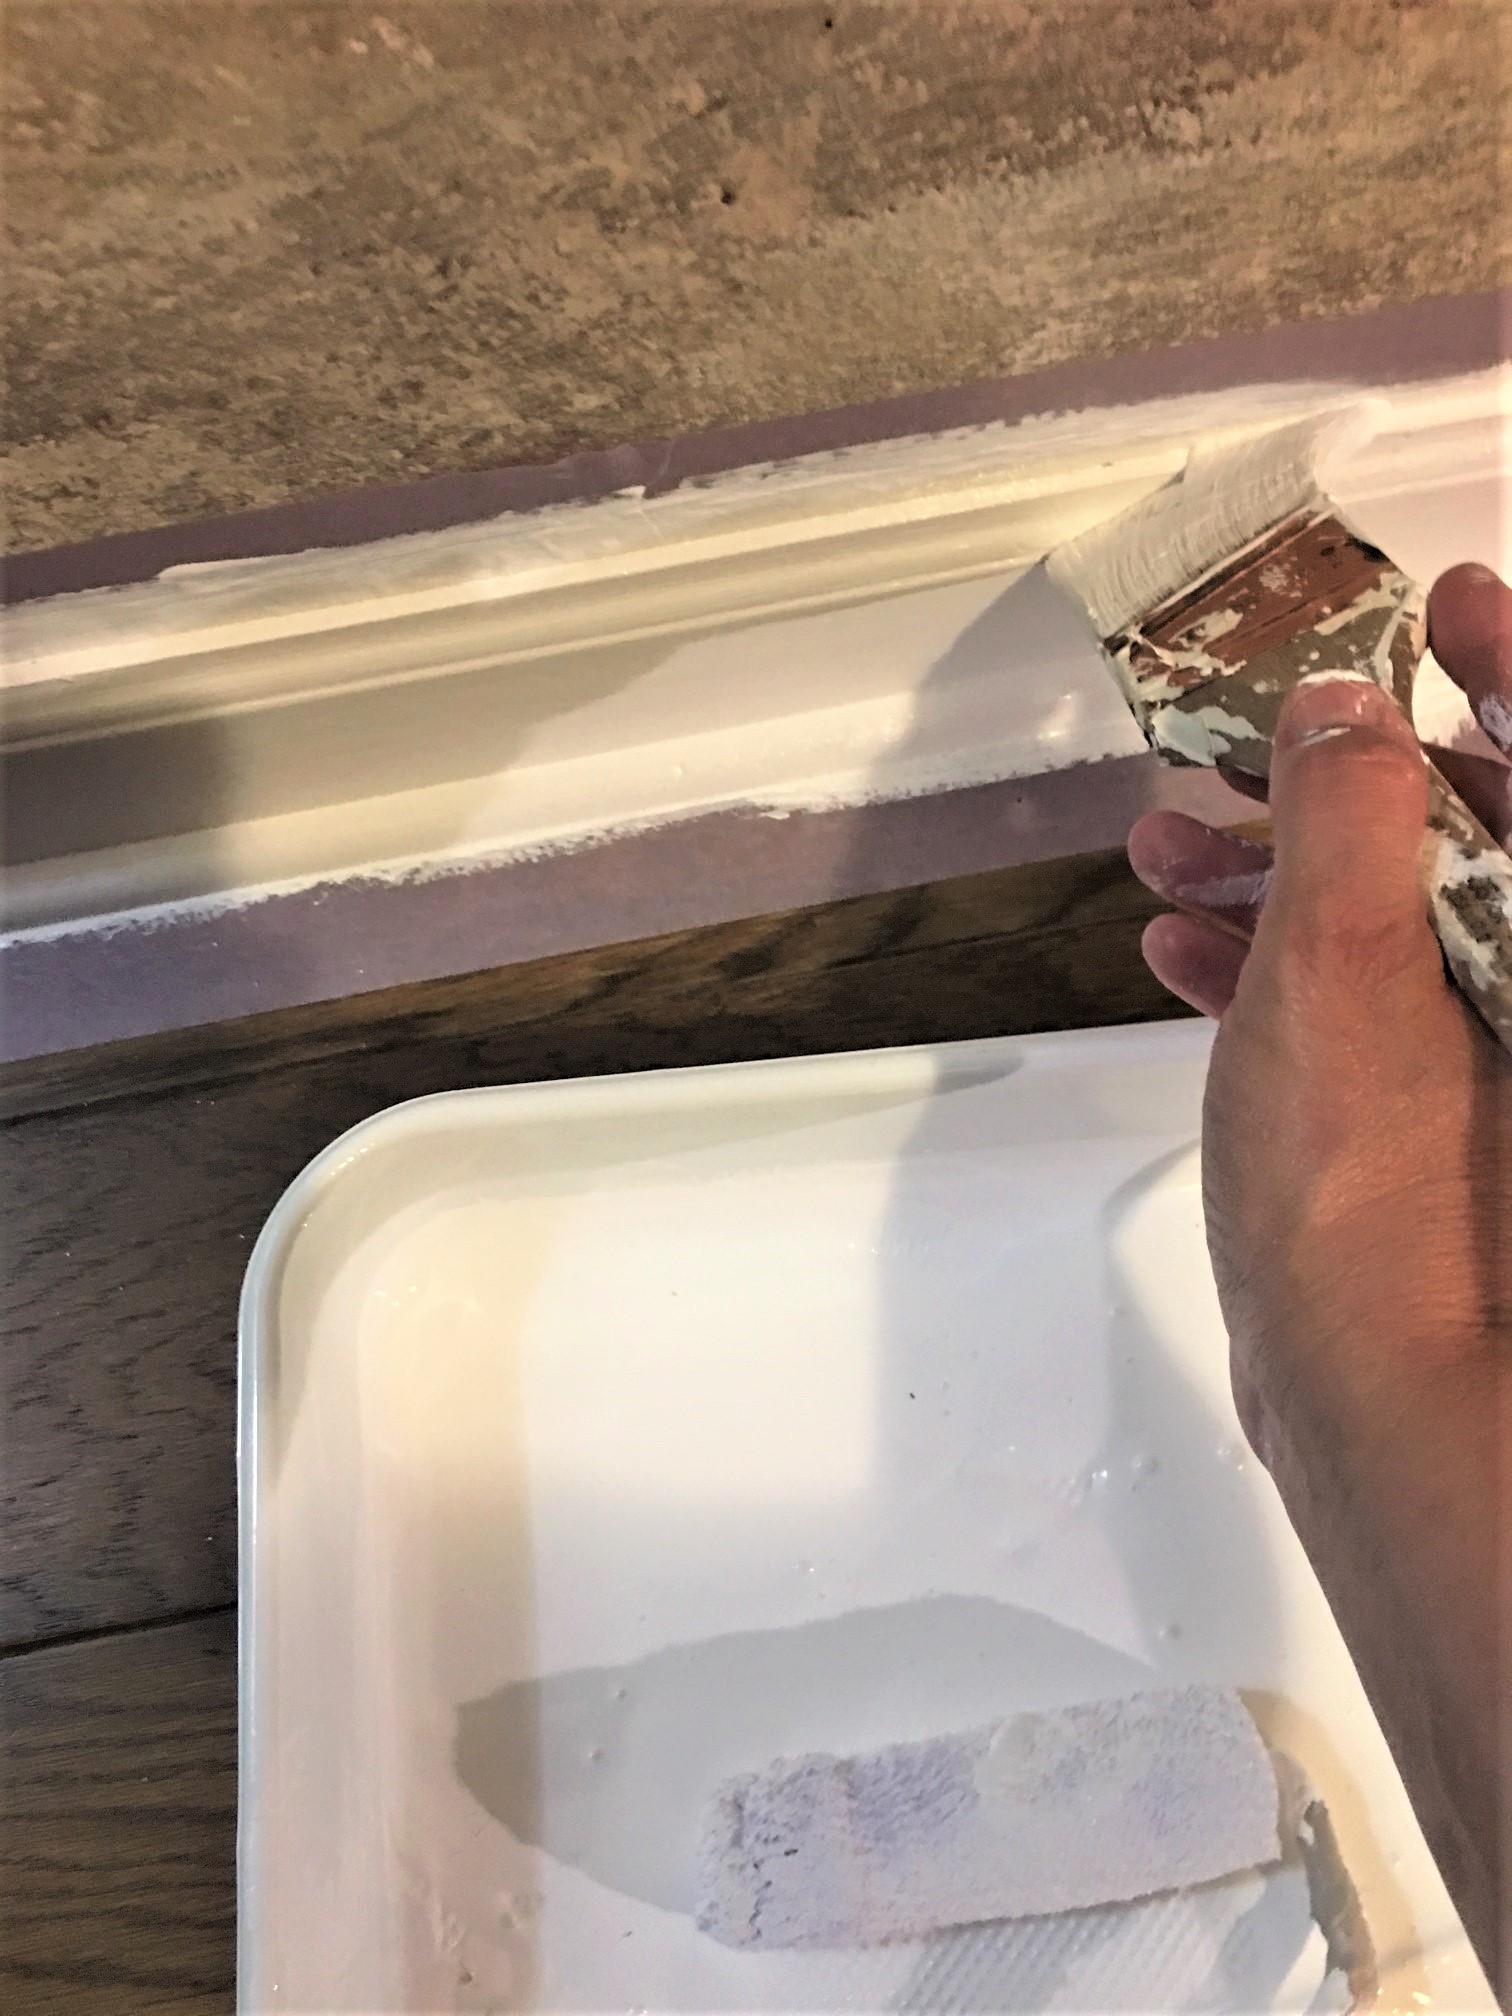
Step 5 : Priming Trim
You do not have to prime all the trim, unless you are painting over raw wood trim for the first time, though it is suggested.
At a bare minimum, you need to prime all areas where bare wood or spackling/wood filler was applied. Otherwise the paint will absorb differently in these areas and be visible in your final paint. Wood resins may also bleed through if not covered in stain-blocking primer.
If you have made quite a few repairs or there is a significant amount of bare wood, it’s often much simpler to prime the entire surface, and that step is suggested to ensure even coverage and appearance.
Apply your primer with a 1.5” or 2” nylon-poly brush. Select a quality paint brush - this is especially critical for trim work! Work in 3-4’ sections, brushing the primer on and then finishing each section before it begins to dry with a single long, light stroke to level out any brush marks.
Allow your primer to dry per the manufacturer’s directions.
Check over your trim one more time before moving on to the next step. Look for any areas where bare wood or spackle / wood filler may still be visible. If any is present, prime those areas a second time.
Step 6 : Sand (Again)*
Repetitive sanding can get, well, exhausting. It’s unexciting and can seem pointless (and endless).
This is where you need to consult your own sense of perfectionism. Are you the sort of person who needs every project to look absolutely perfect? (There’s no shame in it, it’s just how some of us are made!)
If you are, I suggest you move ahead with giving your woodwork a light sanding after you prime. Primer applied with a brush can leave brush strokes, and these brush strokes may (in the right light under the right scrutiny) be visible in the final paint. A light sanding can help level out these brush strokes and give the paint a perfect surface to attach to.
If you are not a perfectionist, and the primer you just applied looks fairly even and level, you can skip this sanding and go to the next step. The chances are good that no one except yourself will ever notice any of the microscopic imperfections caused by failure to sand your primer!
If you’ve sanded, be sure to wipe down the trim again with a tack cloth before moving on to the next step.
Step 7 : Painting Trim (Finally!)
Now we’re finally ready for the step we’ve been building toward all along – painting trim!
If you’ve used any of the other step-by-step instructions on this site you’ll know – the actual painting step in any process is only a small part of the whole. It is the prep work that makes all the difference in the final result.
Be sure to select a quality brand name paint in a satin or semi-gloss. Quality manufacturers such as Benjamin Moore, Sherwin Williams, or PPG are worth the extra upfront cost in their ease and durability.
A note on sheen: Painting trim usually calls for a satin or semi-gloss paint. These paints have a higher surface sheen (or shine), which makes the paint more durable and wipeable.
The downside of a higher sheen surface is that it highlights any surface imperfection. So if you go with a semi-gloss, any surface imperfection may be more visible, especially in higher lighting situations. For this reason I suggest selecting satin (or "pearl") sheen unless your trim is new or in excellent condition.
Start by cutting in along the edge of the trim with your brush. Cut in a few feet at a time, 1-2” in from the edge.
When you load your paint brush, tap it gently against the side of the can instead of wiping the bristles. Tapping it will knock any excess paint free while setting the majority of the paint deeper into the bristles.
After cutting in a few feet on both edges, re-load your brush and fill in the center of the trim. You fill in by “laying in” the paint with a few back and forth swipes of the brush, which releases the paint onto the surface.
Once the paint is laid in, do not reload the brush but drag the brush lightly IN ONE DIRECTION ONLY along the entire length of the freshly painted surface. This will smooth out the paint surface and remove most brush marks. If you purchased a good quality paint it will also self-level, removing more of the brush marks from the surface.
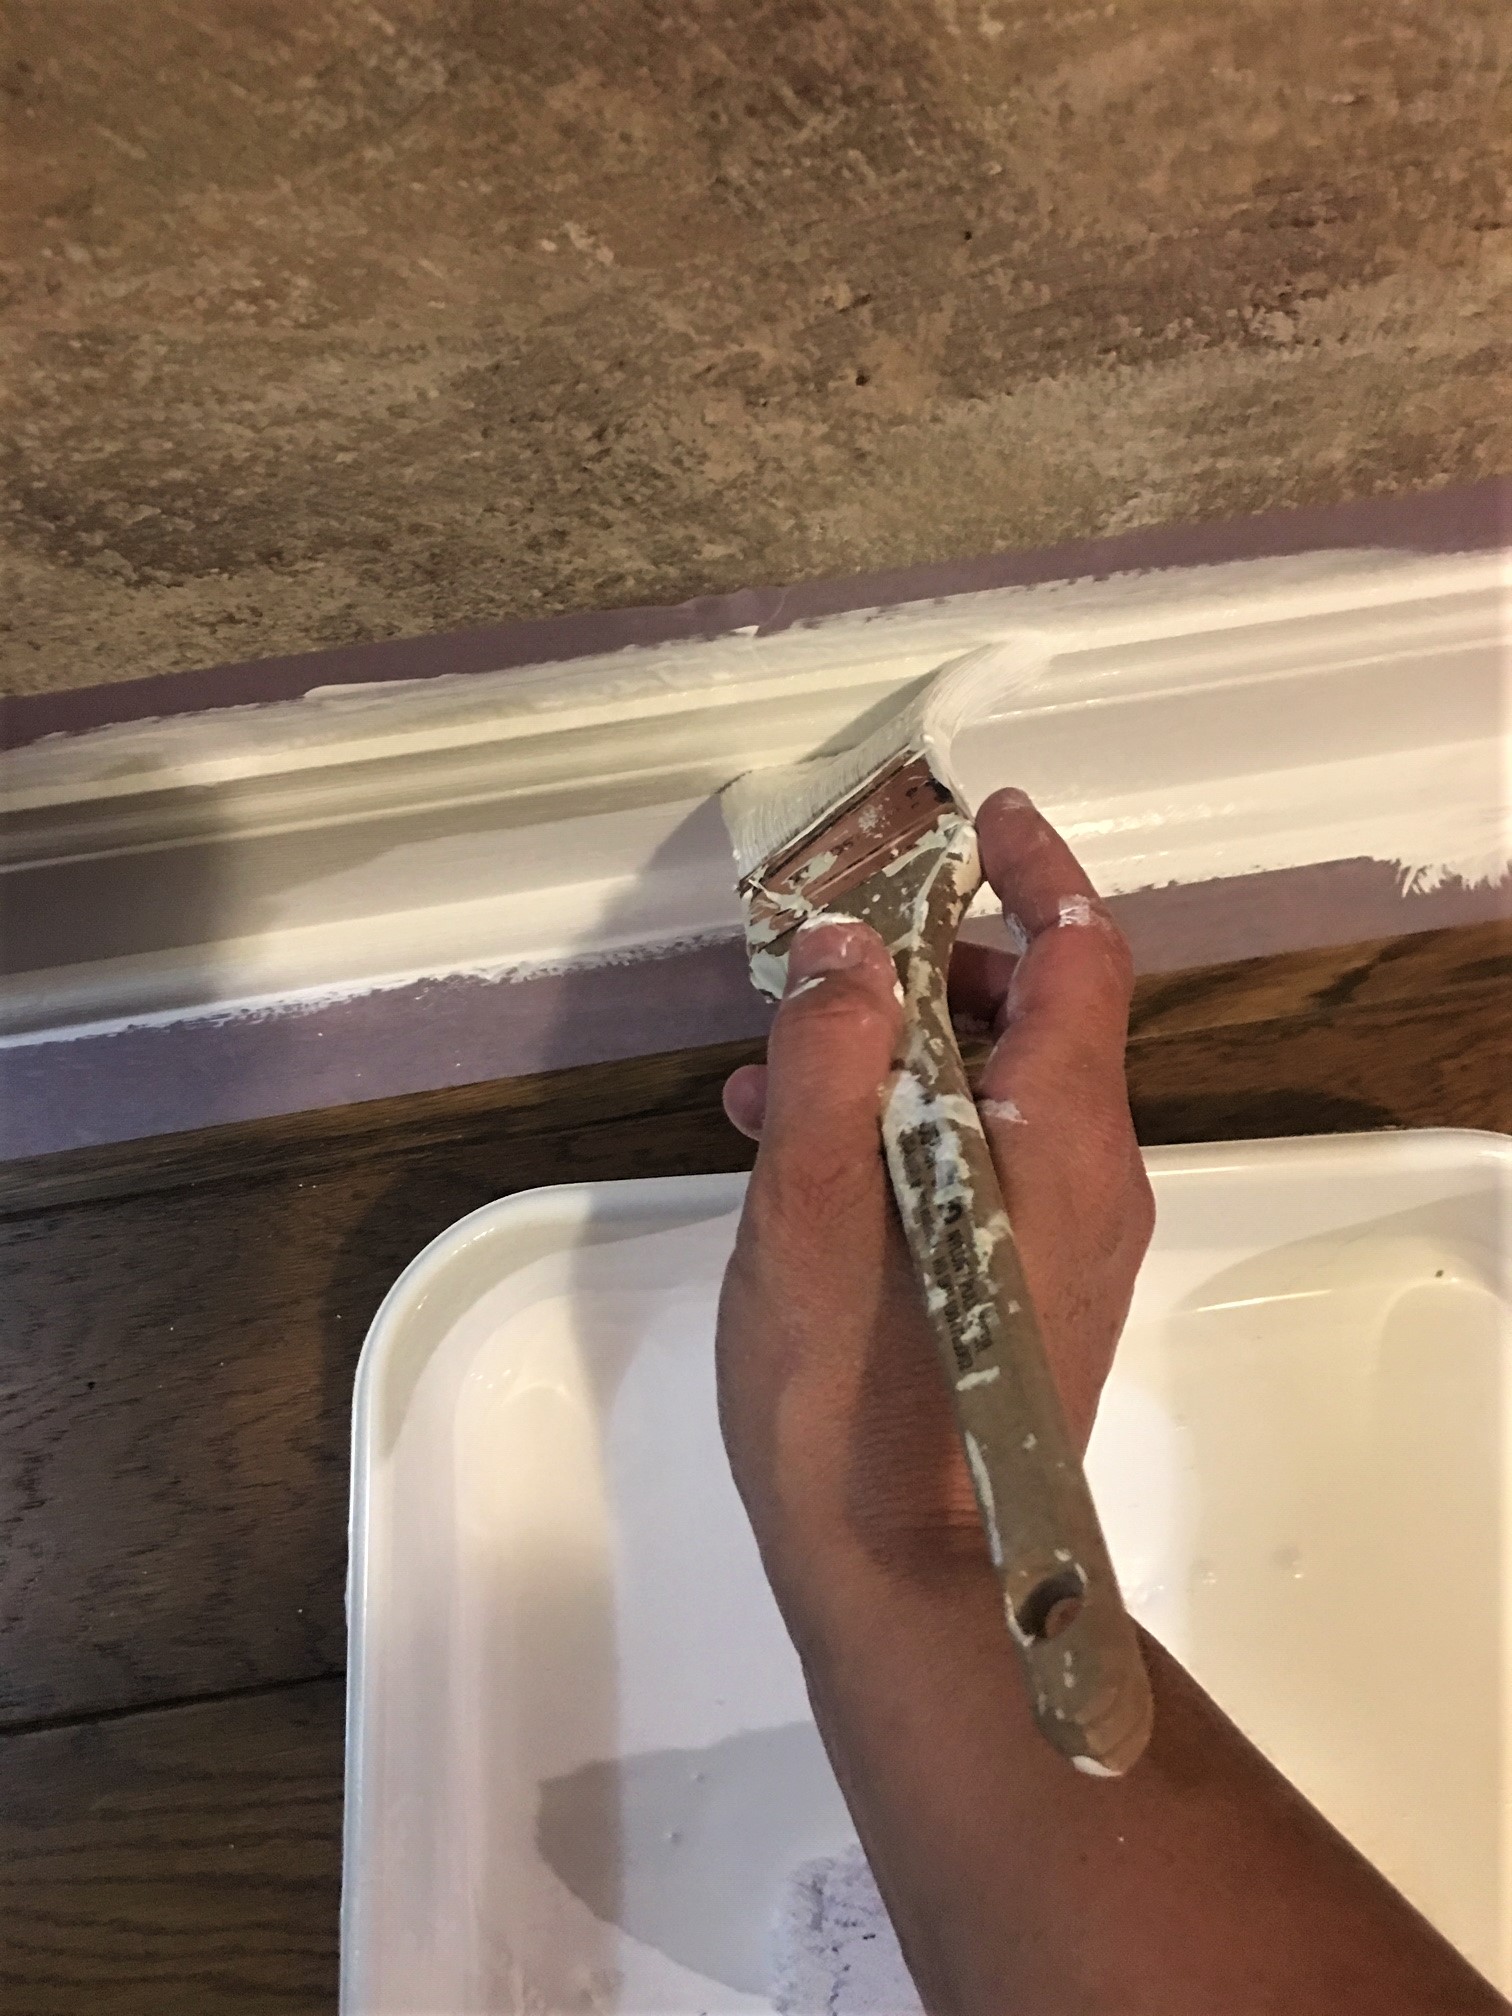
Move immediately on to cut in the next several-foot section of trim. It’s important that you continue to work the entire section of trim without stopping to maintain a wet working edge of paint.
If you stop and allow one section to dry (or partly dry) and overlap that section when you paint the next, you will end up with brush marks and lap-lines in your paint finish.
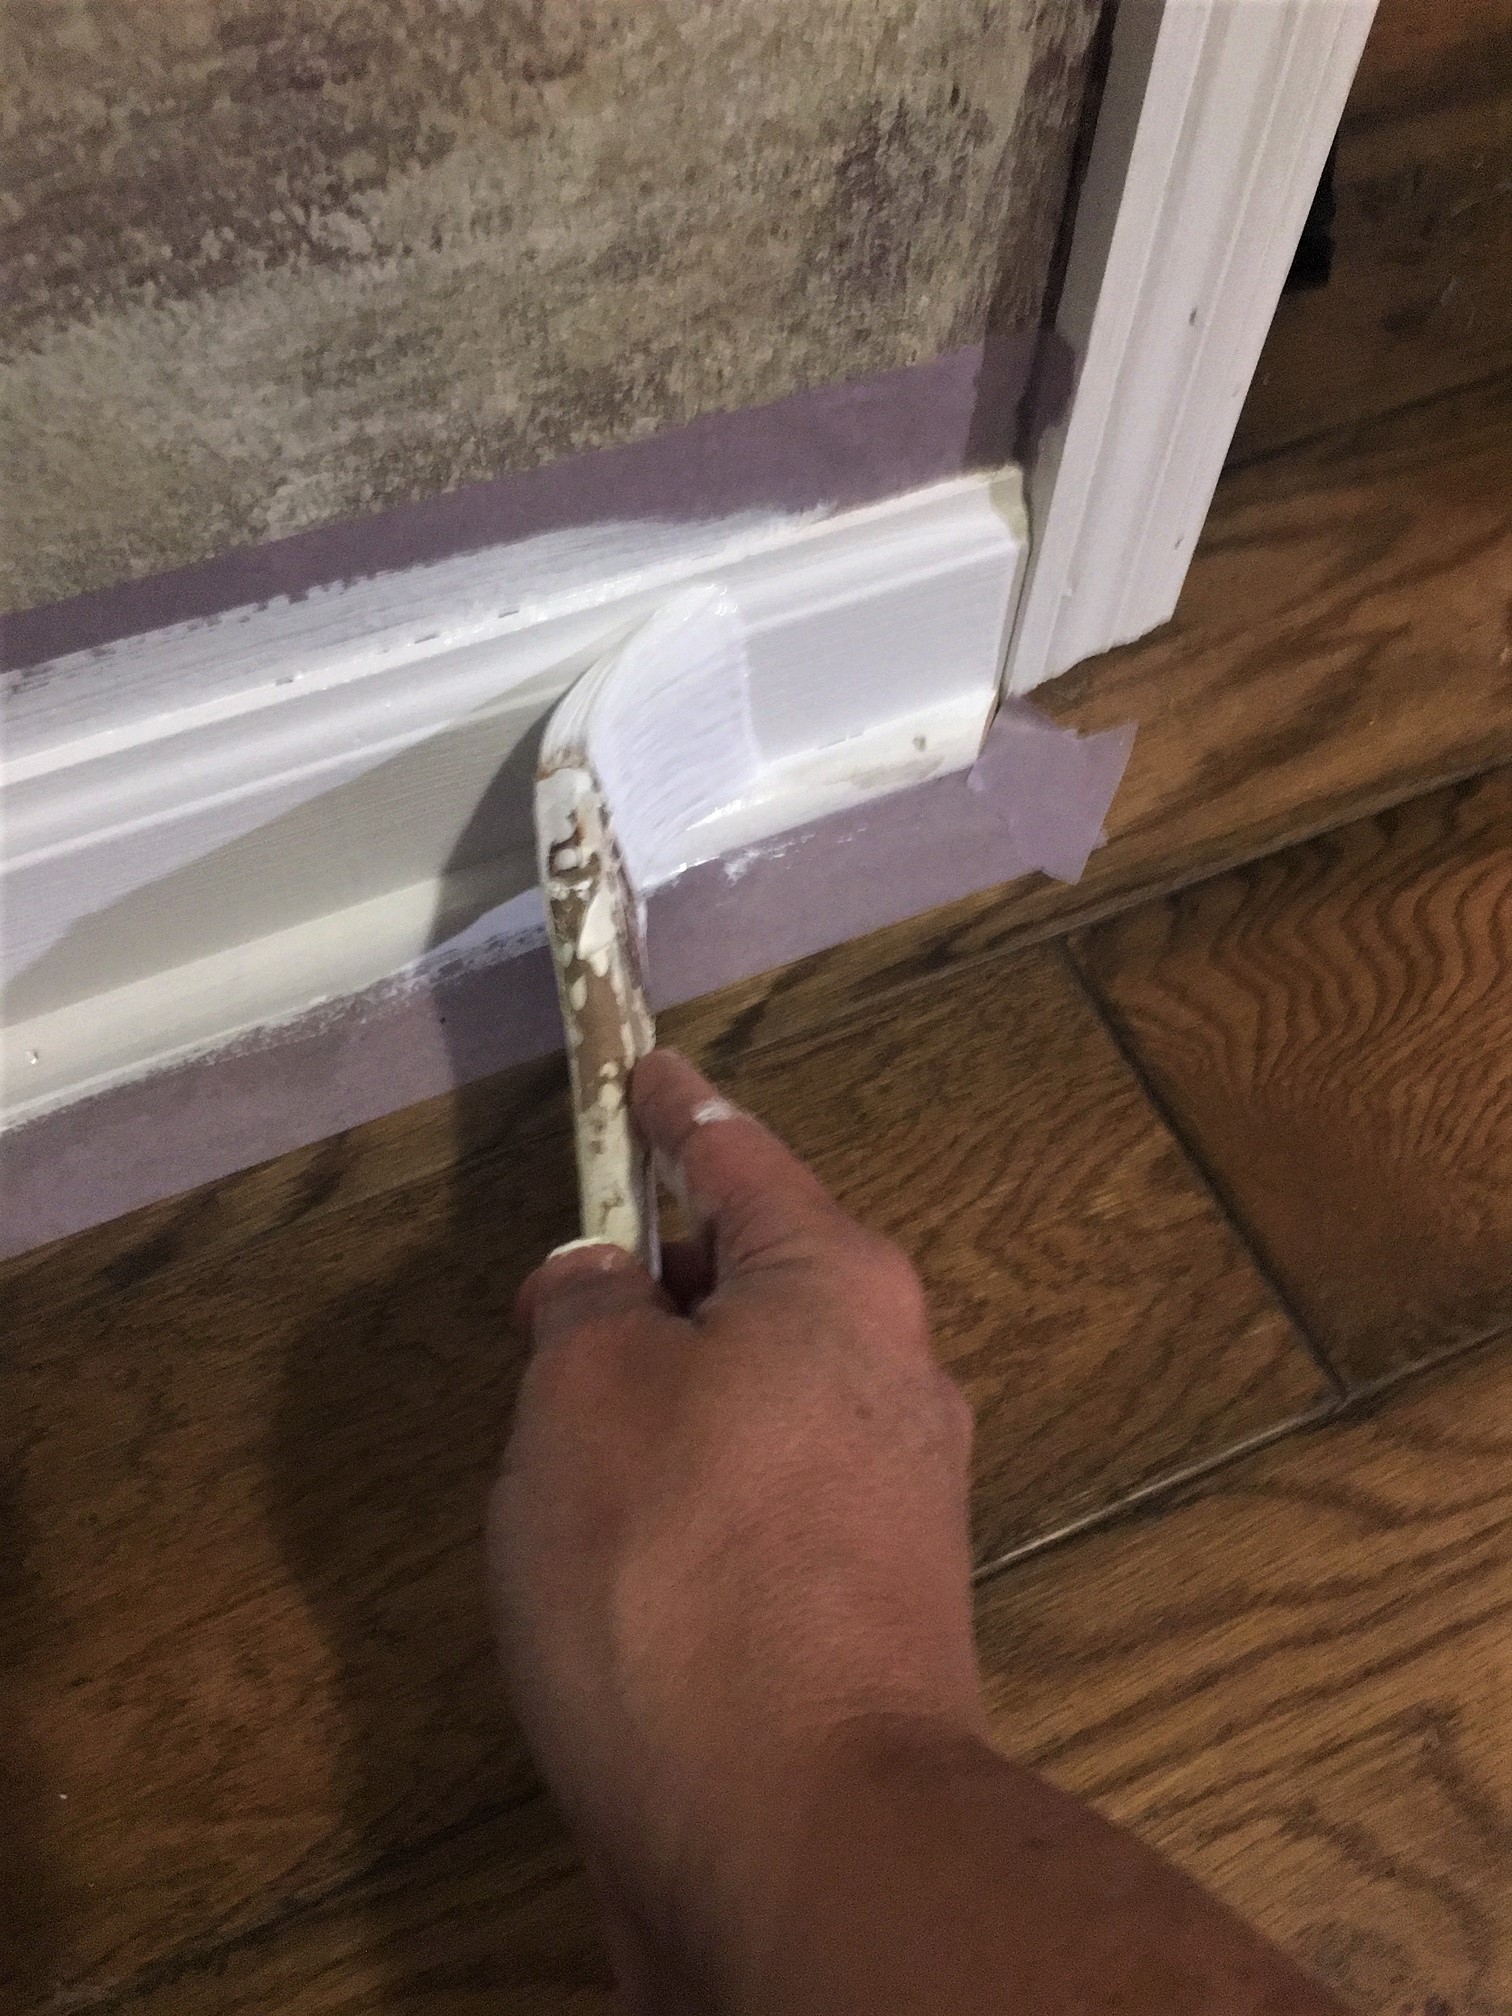
Finish each section with a single leveling swipe in the direction you are working.
Brush parallel to edges of the trim, not across the edges. Brushing across an edge will cause the brush to release paint and will result in drips and runs of paint.
Step 8 : Remove the Tape
Wait at least 4 hours for the paint to dry, then the tape can be removed from the adjacent surfaces.
Do not simply pull the tape away from the wall. This is one of my top Interior Painting Tips. Run a sharp utility knife along the edge of the tape between the newly painted surface and the edge of the tape.
If you do not break the bond that was formed by the paint you risk pulling small patches of your new paint away from the trim.

"I did not know how to paint or even what to paint, but I knew I had to begin." Margaret Atwood, Cat's Eye
Join my monthly email newsletter, "Dip & Swipe", for professional tips, how-to articles, color and decorating ideas, projects, and much more!
Recent Articles
-
Repurpose Old Windows
Dec 10, 21 06:32 PM
 Learn how to repurpose old windows by upcycling them into shabby chic decor.
 -
Upcycling a Toolbox
Dec 08, 21 10:22 PM
 In this craft painting project, I upcycle an old toolbox with fresh paint and an appliqué.
 -
Craft Painting Projects
Dec 08, 21 08:13 PM
 A place for all of my smaller craft painting projects and DIY projects that don't fit elsewhere.
Follow me on Pinterest @